
Which Makeup Look Suits Your Face? Let AI Show You
By Maria · 2026-08-03
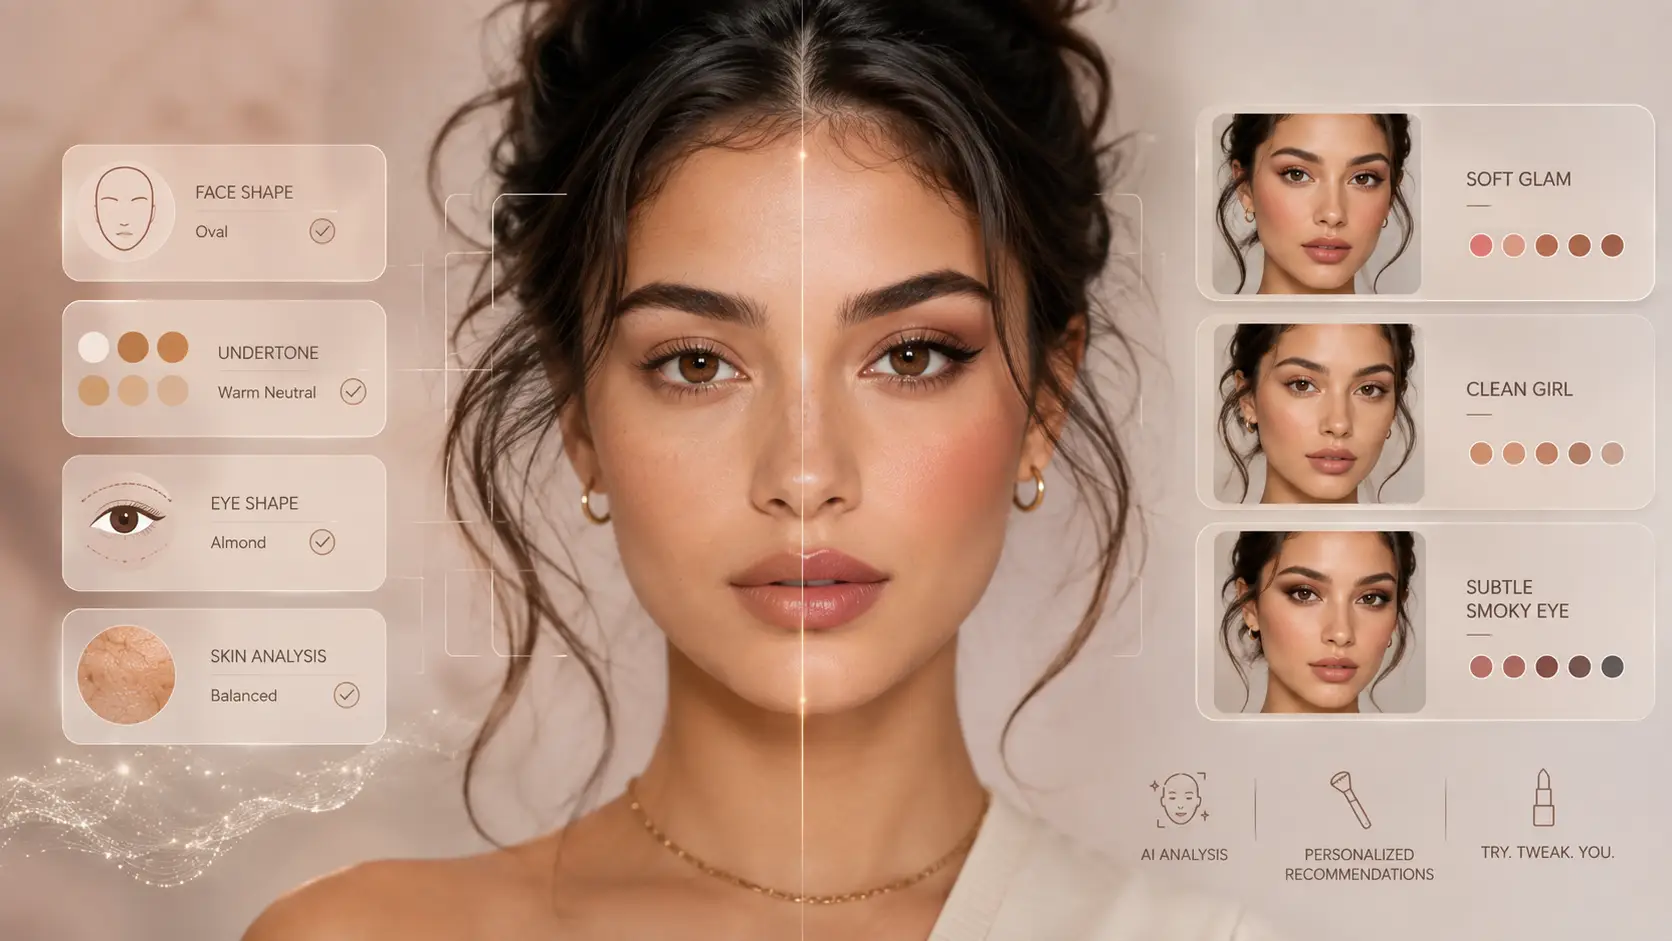
Not every makeup trend suits every face in the same way. Learn how your features, colouring and skin texture influence makeup—and preview different looks with Betatum AI Makeup before choosing one.
You see a soft-glam, clean-girl or smoky eye look on a creator, recreate it step by step and wonder why it does not look the same on you.
Here is the truth: it is rarely just about your makeup skills or the products you used. Makeup looks different on everyone because of variations in bone structure, eye and lip shape, skin undertone, texture, feature contrast and lighting. The perfect look is not simply about matching makeup to your face shape; it is about complementing your individual features, colouring and personal style.
This is where technology can help. An AI makeup generator or virtual makeup try-on tool allows you to test different looks on your own photo before buying products or picking up a brush. So, if you have ever wondered, “Which makeup suits me?”, how can you find a look that genuinely enhances your features, feels like you and works in real life?
Summary
In this guide, you will learn how face shape, bone structure, eye shape, skin undertone, texture and natural contrast can influence the way makeup appears on you. You will also discover how to choose suitable colours, finishes and makeup aesthetics for different occasions. Instead of relying on strict beauty rules, you will learn how to compare different options based on the effect you want to create. The guide also explains how to use Betatum AI Makeup to preview looks on your own photo, evaluate the results and turn your favourite AI-generated style into makeup you can realistically wear.
What Makeup Actually Suits Your Face?
The makeup that suits you best should work with your natural proportions rather than attempt to copy someone else’s features. It should complement your skin tone and undertone, enhance the natural shape of your eyes and lips, and work with your real skin texture—not only look flattering under filters or studio lighting.
The right look should also suit the occasion, reflect your personality and create the effect you want, whether that feels fresh, polished, dramatic or understated. Most importantly, you should still recognise yourself when you look in the mirror.
AI can help you compare makeup styles, explore new ideas and see how different choices may look on your face. However, it should remain a visual experimentation tool—not a judge of your beauty or worth.
Start With the Effect You Want—Not a Face-Shape Rule
Before choosing a makeup style, decide what you want the makeup to achieve. Do you want your features to appear more lifted, softer, brighter, or more defined? Starting with the desired effect is often more useful than following a strict face-shape rule.
Two people may both have round, oval, or square faces, yet still need very different makeup placement. Their eye shape, cheekbone structure, skin colouring, feature contrast, and personal preferences may not be the same. Face shape can offer general guidance, but it cannot determine the best makeup look on its own.
Use the table below to identify a direction worth testing:
The Effect You Want | Makeup Direction to Test | What to Check in an AI Preview |
|---|---|---|
A more lifted appearance | Upward blush, extended liner, and outer-corner definition | Does the placement lift the features without making them look stretched? |
Softer-looking angles | Diffused contour, rounded blush, and softly blended eyeshadow | Are stronger angles softened without removing natural definition? |
More facial definition | Strategic contour, structured brows, and controlled highlight | Does the added depth look natural rather than muddy or overly sharp? |
A brighter, fresher look | Lightweight base, fresh blush, and subtle inner-corner brightness | Does the complexion look awake rather than pale or washed out? |
A natural everyday result | Sheer base, softly defined brows, mascara, and muted lips | Does the look still feel natural in ordinary lighting? |
A stronger statement | Bold lips, smoky eyes, or graphic eyeliner | Is there one clear focal point, or do the elements compete for attention? |
Better definition in photos | Controlled shine, defined eyes, and slightly stronger colour | Do the features remain visible and balanced under camera lighting? |
An AI makeup preview can help you compare these directions on your own face, but the goal is not to find a single “correct” look. It is to discover which placement, colour intensity, and level of contrast create the effect you want while still feeling comfortable and recognisable.
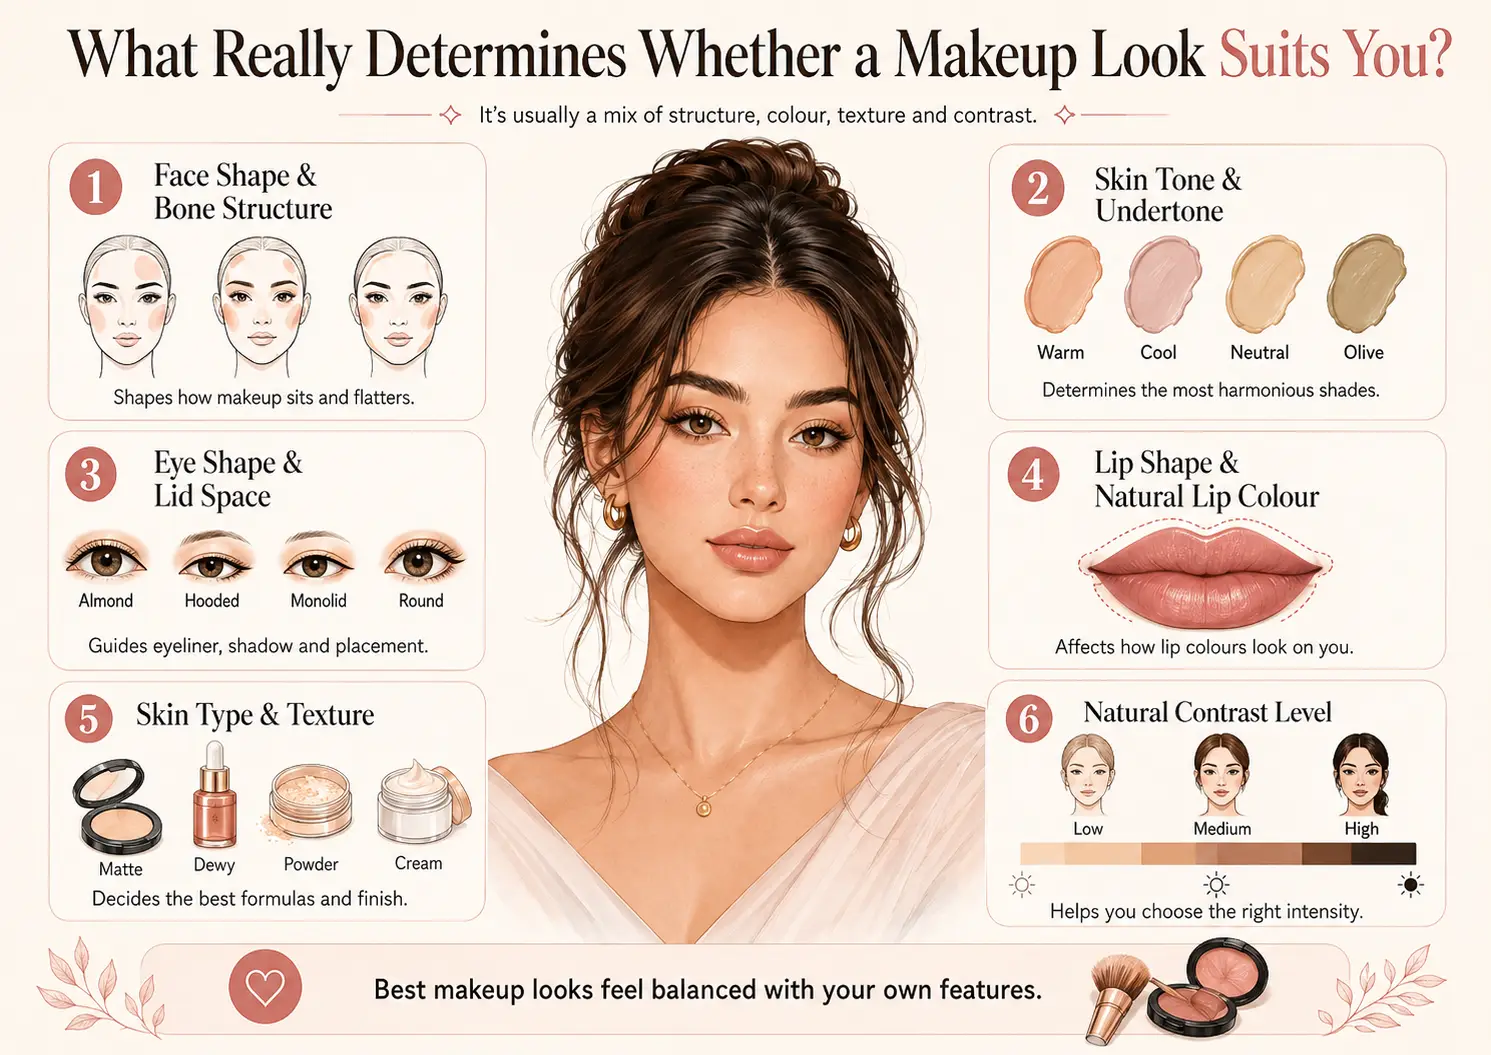
What Really Determines Whether a Makeup Look Suits You?
A successful makeup look rarely comes from following one beauty rule. It is usually the result of several connected factors working together, including facial structure, colouring, eye and lip shape, skin texture and natural contrast. Face shape can offer a useful starting point, but it cannot explain on its own why the same blush, eyeliner or lipstick looks different from one person to another.
Face Shape and Bone Structure
Face shape is influenced by the relative width and length of the face, as well as the proportions of the forehead, cheekbones, jawline and chin. These features affect how makeup placement changes the overall balance of the face.
Blush placed higher on the cheeks may create a more lifted effect, while a softer, rounded placement can produce a gentler result. Contour direction can follow the natural structure of the cheekbones or jawline, depending on the depth and definition you want to create. Highlight placement brings attention to selected areas, while brow direction and the outward extension of eye makeup can influence whether the face appears more elongated, open or structured.
The goal is not to “fix” a particular face shape. It is to understand how different placements interact with your natural proportions and choose the effect that feels most flattering to you.
Skin Tone and Undertone
Skin tone and undertone are related, but they are not the same thing.
Skin tone: The visible depth of the complexion, such as fair, light, medium, tan or deep. It may change slightly with sun exposure, the season or certain products.
Undertone: The more stable underlying hue beneath the skin, commonly described as warm, cool, neutral or olive.
Undertone influences how foundation, blush, bronzer, lipstick and eyeshadow appear on the face. A shade that looks balanced on one person may appear warmer, cooler, brighter or duller on someone with a different undertone.
Since no single test, such as checking wrist veins or comparing gold and silver jewellery, is always reliable, it is better to compare several shades in natural light. Look at how each colour interacts with your complexion, eyes, hair and overall colouring before deciding which one feels most harmonious.
Eye Shape and Visible Lid Space
Eye makeup depends not only on eye shape but also on how much of the eyelid remains visible when the eyes are open. Common eye characteristics include almond, round, hooded, monolid, deep-set, upturned and downturned shapes.
The same eyeliner or smoky-eye technique will not appear equally visible on every eye. Liner drawn neatly across a closed eyelid may partly disappear when a hooded eye opens, while thick liner may cover most of the visible lid space on a monolid. Deep-set eyes naturally create more shadow, while upturned and downturned eyes can change how the angle of eyeliner affects the overall expression.
For this reason, check eye makeup with your eyes both open and closed. The finished look should remain visible and balanced during normal expressions, not only when the eyelid is lowered.
Lip Shape and Natural Lip Colour
Lipstick can look noticeably different depending on the natural shape, colour and texture of the lips. Fullness, the Cupid’s bow, border definition, symmetry and surface texture all affect how colour and finish appear.
Natural lip pigmentation is especially important. The same lipstick may look warmer, cooler, lighter, deeper or more muted depending on the colour underneath it. A sheer pink may appear bright on lightly pigmented lips but deeper or more neutral on naturally darker lips.
Thin lips do not have to be made larger, just as fuller lips do not need to appear smaller. The best approach is to work with your natural lip shape while choosing the amount of definition, contrast and intensity you prefer.
Skin Type and Texture
Dry, oily, combination, textured, mature and acne-prone skin can each change how a formula or finish appears after application.
Matte products: Can help control shine, but may emphasise dry or textured areas when applied heavily.
Dewy products: Can create a fresh appearance, although they may look overly shiny on oilier areas.
Powder: May improve longevity, but excessive use can make the complexion appear flat or accentuate fine lines.
Cream products: Often blend smoothly, although their wear time may vary depending on the skin and environment.
Heavy foundation and strong shimmer may draw more attention to texture rather than create a smoother appearance. This does not mean certain finishes are off-limits. It simply means that formula, quantity and placement matter as much as colour.
Your Natural Contrast Level
Natural facial contrast describes the difference in depth between your skin, hair, eyes and brows. Someone whose features have a similar level of depth may have lower contrast, while someone with a clearer difference between light and dark features may have higher contrast.
Lower contrast: May feel naturally balanced with softer transitions, muted colours and gentle definition.
Medium contrast: Can often support both subtle looks and moderately defined makeup.
Higher contrast: May accommodate deeper colours, sharper lines and bolder focal points more easily.
These are visual tendencies, not fixed restrictions. A lower-contrast face can still suit a bold lip, while a higher-contrast face can look balanced in minimal makeup. Contrast simply helps explain why certain levels of intensity may feel more immediately harmonious than others.
Find Your Face Shape Without Forcing Yourself Into One Box
Face-shape guides often divide people into clear categories such as oval, round, square, heart-shaped, or diamond-shaped. In reality, many faces combine characteristics from two or more shapes. You might have an oval face with a stronger jawline, a round face with a slightly pointed chin, or a heart-shaped face with softer cheekbones.
Instead of trying to force your face into one exact category, look at its individual proportions. Compare the width of your forehead, cheekbones, and jawline, then consider the overall length of your face and the shape of your chin. These details can provide more useful guidance than a single label.
Every face is different, so makeup techniques should be adapted to the individual. Blush, contour, highlight, brows, and eye makeup can all be adjusted according to your unique structure and the effect you want to create.
Your face shape is a starting point—not a rulebook. Use it to explore different placements, but judge the final result by how balanced, comfortable, and recognisable it feels on your own face.
A Quick Way to Check Your Face Shape
You do not need professional measurements to get a general idea of your face shape. A few simple observations in a mirror or well-positioned photo can help you compare your facial proportions more clearly.
Pull your hair completely away from your face so your forehead, cheekbones, and jawline are clearly visible.
Stand directly in front of a mirror or camera and keep your head level rather than tilting it up, down, or to one side.
Compare the width of your forehead, cheekbones, and jawline. Notice which area appears widest and whether the differences are subtle or more defined.
Compare the total length of your face with its width. A noticeably longer face may suggest an oval or oblong influence, while similar length and width may suggest a rounder or squarer structure.
Look closely at your jaw and chin. Consider whether your jaw appears rounded, angular, or tapered, and whether your chin looks soft, broad, or slightly pointed.
Choose the closest face shape or a combination of two shapes. You do not need to fit perfectly into one category for the guide to be useful.
Keep in mind that a phone camera placed too close to your face can exaggerate the centre of your face and distort its proportions. For a more accurate comparison, move the camera farther away and use a neutral, straight-on angle.
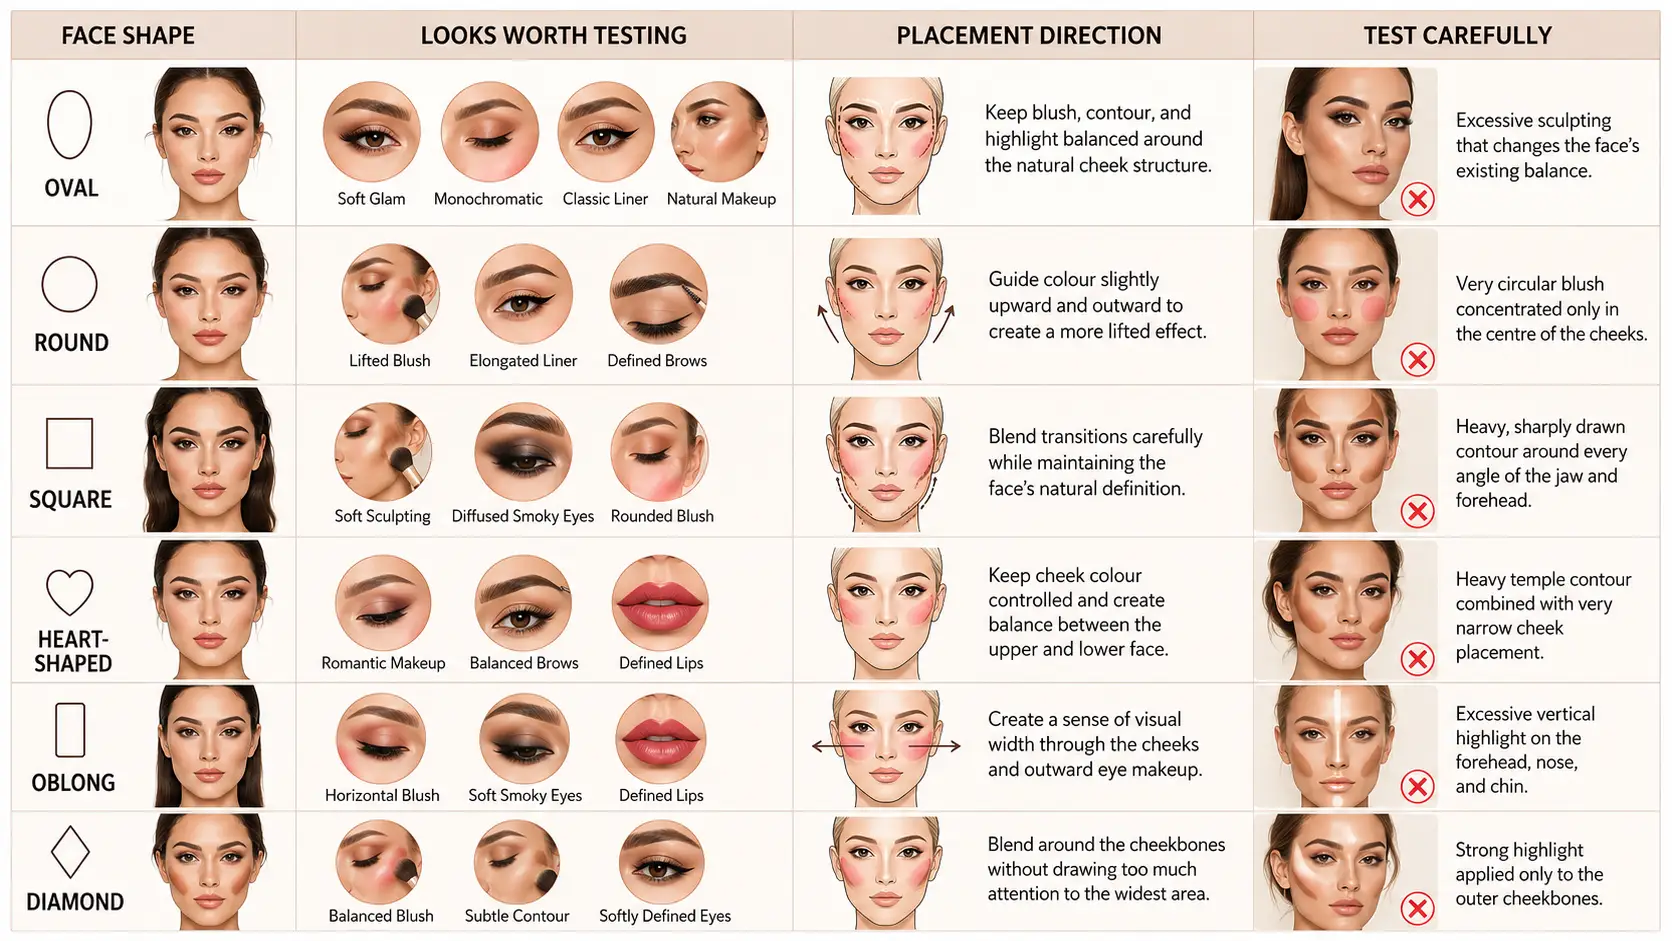
Makeup Looks to Try for Different Face Shapes
These recommendations are starting points for experimentation, not rules for correcting a face shape. The goal is to explore how different placements interact with your natural structure and choose the effect that feels most balanced and comfortable to you.
Face Shape | Looks Worth Testing | Placement Direction | Test Carefully |
|---|---|---|---|
Oval | Soft glam, monochromatic makeup, classic liner, and natural makeup | Keep blush, contour, and highlight balanced around the natural cheek structure | Excessive sculpting that changes the face’s existing balance |
Round | Lifted blush, elongated liner, and softly defined brows | Guide colour slightly upward and outward to create a more lifted effect | Very circular blush concentrated only in the centre of the cheeks |
Square | Soft sculpting, diffused smoky eyes, and rounded blush | Blend transitions carefully while maintaining the face’s natural definition | Heavy, sharply drawn contour around every angle of the jaw and forehead |
Heart-shaped | Romantic makeup, balanced brows, and defined lips | Keep cheek colour controlled and create balance between the upper and lower face | Heavy temple contour combined with very narrow cheek placement |
Oblong | Horizontal blush, soft smoky eyes, and defined lips | Create a sense of visual width through the cheeks and outward eye makeup | Excessive vertical highlight on the forehead, nose, and chin |
Diamond | Balanced blush, subtle contour, and softly defined eyes | Blend around the cheekbones without drawing too much attention to the widest area | Strong highlight applied only to the outer cheekbones |
Treat these directions as ideas to test rather than formulas to follow exactly. Two people with the same general face shape may still prefer different blush angles, contour intensity, or eye makeup because their cheekbones, eyes, colouring, and personal style are different.
Your Eye Shape May Matter More Than the Trend
Popular makeup techniques do not always look the same on every eye. Eye shape, visible lid space, crease depth, and the natural angle of the outer corner can all affect how eyeliner and eyeshadow appear. Use the table below as a starting point for comparing different techniques—not as a set of strict rules.
Eye Shape | Makeup to Test | Eyeliner Direction | Common Mistake |
|---|---|---|---|
Almond | Soft wing, gradient eyeshadow, and smoky liner | Keep the line thin near the inner corner and gradually make it thicker toward the outer corner | Covering the full lid with a thick line |
Round | Outward eyeshadow and extended liner | Use a slightly horizontal extension to create more balance | Applying equal thickness around the entire eye |
Hooded | Visible crease colour and controlled liner | Keep key details visible when the eyes are open | Placing all the detail inside the hidden crease |
Monolid | Layered gradients and a defined lash line | Follow the lash line or create a visible graphic shape | Applying one flat, dark shade without dimension |
Deep-set | Lighter lid colour and controlled crease depth | Avoid overly dark definition near the inner eye | Darkening the entire eye socket |
Downturned | Lifted outer eyeshadow and upward liner | Direct the tail gently upward | Following the outer corner downward |
Upturned | Balanced upper and lower definition | Follow or slightly soften the natural lift | Making the wing excessively steep |
These suggestions are not limitations. You can adapt any technique based on your preferred style, the occasion, and the effect you want to create.
Choose Makeup Colours That Work With Your Undertone
Makeup colours can interact with your undertone, skin depth and natural contrast, but no single colour rule works for everyone. The same blush or lipstick may look different depending on its intensity, finish and the rest of your makeup.
Use undertone as a starting point rather than a strict formula. Then compare shades directly on your face to see which ones make your complexion look clearer, fresher or more balanced.
Do Not Rely on One Undertone Test
Popular undertone tests can offer useful clues, but none is completely conclusive on its own. Vein colour can be difficult to judge, jewellery preferences may reflect personal style, and white-shirt tests can change depending on lighting and the exact shade of white.
A more practical approach is to combine several observations:
Test foundation along the jawline and slightly onto the neck.
Let foundation sit for a few minutes before judging the colour.
Check the result in natural daylight.
Compare warm and cool versions of similar shades, such as peach and pink blush.
Notice whether gold or silver jewellery makes your complexion appear brighter.
Pay attention to colours that consistently make your skin look fresher and more even.
The following shades are useful starting points, not strict limits:
Undertone | Blush Colours | Lip Colours | Eye Colours |
|---|---|---|---|
Warm | Peach, coral and warm terracotta | Brick, warm red and peachy nude | Bronze, copper, gold and warm brown |
Cool | Rose, berry and cool pink | Blue-red, mauve and berry | Taupe, plum, silver and cool brown |
Neutral | Balanced rose and nude peach | Neutral red, rosewood and balanced nude | A mix of moderately warm and cool shades |
Olive | Muted peach, earthy rose and bronze | Terracotta, brown-rose and muted red | Bronze, khaki and muted plum |
Olive undertones can lean warm, neutral or cool, so muted shades may be easier to wear than colours that are extremely warm or cool.
These suggestions can help narrow your options, but they should not stop you from wearing a colour you enjoy. A cool undertone can still suit a warm lipstick, and an olive undertone can still wear bright pink. The shade’s depth, saturation and finish can change how it appears, so compare different versions before deciding whether a colour works for you.
Match the Makeup Finish to Your Skin
The right finish can make skin look smoother, more even, and more like itself—not heavier or older. Use this table to choose what to test first, then adjust by area and season.
Skin characteristic | Finish to test | Suitable product direction | What to watch for |
|---|---|---|---|
Dry skin | Natural, satin, or controlled dewy | Flexible cream and liquid formulas; hydrating primers; avoid thick matte all over | Product catching or clinging on dry patches; finish looking flaky or uneven |
Oily skin | Natural-matte or soft-matte | Long-wear liquids, thin layers, targeted powder on T-zone; blot before re-powdering | Excess shine in the centre of the face; cakey buildup from repeated touch-ups |
Combination skin | Different finishes by area | Cream or satin on drier cheeks; soft-matte or light powder on oilier zones; same shade, different texture if needed | Treating the whole face identically—shine in T-zone or dryness on cheeks |
Visible texture | Lightweight, flexible finish | Thin layers, finely milled powder sparingly; skin-tint or light coverage; blend with damp sponge | Heavy shimmer, thick full coverage, or heavy powder emphasising texture |
Mature skin | Lightweight satin or natural | Buildable cream or very soft powder; hydrating prep; less product in lines | Thick formulas settling into fine lines; matte finishes looking flat or dry |
Acne-prone skin | Controlled, buildable coverage | Blendable layers (thin liquid or cream spot-build); non-comedogenic where it matters to you; set only where needed | Too many corrective layers (colour corrector + heavy concealer + thick foundation) creating a mask-like look |
Quick application notes
Dry skin: Prep with moisturiser; press foundation in rather than dragging on flaky areas.
Oily skin: One thin base layer; powder where you shine, not necessarily the whole face.
Combination: Map zones (forehead, nose, chin vs cheeks) and match finish to each.
Texture: Less is more; finish with light mist or thin balm on high points instead of glitter on textured areas.
Mature: Less powder under the eyes; satin finishes on the cheeks may look softer and less flat than a fully matte finish.
Acne-prone: Cover in thin passes; let each layer set briefly before adding more only where needed.
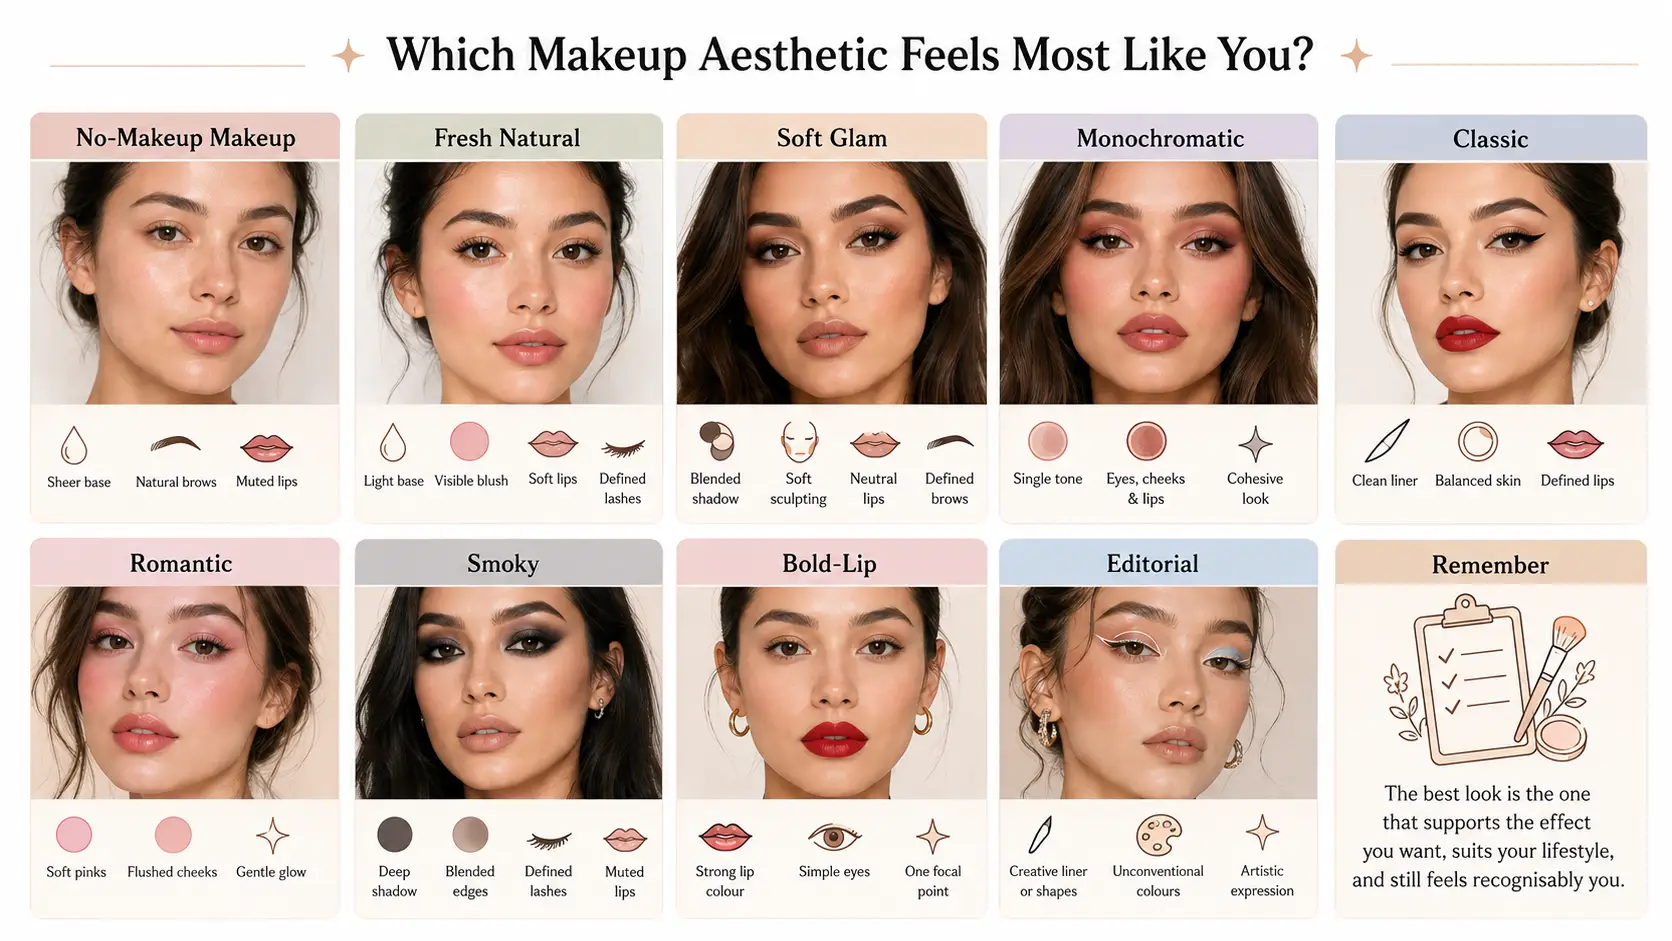
Which Makeup Aesthetic Feels Most Like You?
Once you understand how your features, colouring and skin affect makeup, the next step is to think about the overall aesthetic you want to create. A look may suit your face technically, but it should also match your personality, routine and the way you want to present yourself.
No-Makeup Makeup
No-makeup makeup uses a sheer base, natural-looking brows, lightly defined lashes and muted lips. It is ideal for anyone who wants to appear polished while keeping the result almost bare.
During an AI preview, check whether the look enhances your features without making the skin appear unnaturally smooth or erasing its real texture.
Fresh Natural Makeup
Fresh natural makeup usually combines a light base, visible blush, defined lashes and a soft lip colour. It works well for readers who want a brighter and more energetic everyday look.
Ask whether the colour makes your complexion look awake and healthy or creates too much redness.
Soft Glam
Soft glam includes blended eyeshadow, subtle sculpting, softly defined brows and neutral lips. It adds definition without relying on harsh lines or extreme contrast.
When reviewing the preview, look at the whole face and ask whether the eyes, cheeks and lips feel balanced.
Monochromatic Makeup
Monochromatic makeup uses similar tones across the eyes, cheeks and lips. Rose, peach, bronze and brown are common choices for creating a cohesive, modern result.
Check whether the chosen colour family flatters the whole face. A shade that looks good on the lips may not have the same effect around the eyes or across the cheeks.
Classic Makeup
Classic makeup often features clean eyeliner, balanced-looking skin and defined lips. It is a useful direction for anyone who wants a polished and timeless appearance.
During the preview, consider whether the result feels elegant and current rather than overly formal or dated.
Romantic Makeup
Romantic makeup is built around soft pinks, diffused edges, flushed cheeks and a gentle glow. It creates a softer and more approachable effect.
Pay attention to how the rosy shades interact with your complexion. Ask whether they flatter your colouring or make existing redness appear more noticeable.
Smoky Makeup
Smoky makeup uses deeper eyeshadow, softly blended edges, defined lashes and muted lips. It is often chosen for evening wear or whenever the eyes are intended to be the main focal point.
Check whether the eye makeup remains open and visible. Very dark colour can overwhelm limited lid space or make the eyes appear smaller.
Bold-Lip Makeup
Bold-lip makeup creates one clear focal point by pairing a strong lip colour with simpler eye makeup. Red, berry, plum, coral and deep brown are common directions.
Ask whether the lipstick brightens your complexion and balances the face or overpowers your other features.
Editorial Makeup
Editorial makeup uses graphic liner, unconventional colours, artistic shapes or unexpected placement. It is designed more for creative expression than everyday practicality.
Judge the preview according to its purpose. A look may be successful for a photoshoot, festival or creative project even if it would not suit your usual routine.
The best makeup aesthetic is not necessarily the most flattering trend or the one an AI tool rates most highly. It is the look that supports the effect you want, suits your lifestyle and still feels recognisably yours.
Let AI Show You the Difference Before You Apply Anything
Virtual makeup tools let you preview different looks without ever picking up a product. By mapping your unique features—from your eye shape to your lip line—these tools can digitally apply colour, adjust placement, or experiment with a complete makeup aesthetic on your photo.
For example, using a tool like Betatum AI , you can test different aesthetics on the exact same photo. Because your face, lighting, and expression remain consistent, it becomes easy to notice exactly how a change in blush placement, eyeliner shape, or lip shade shifts your overall look.
Think of these previews as a “decision support” tool rather than a perfect prediction of real-life products. They can help you narrow down your options and spend less time testing unsuitable directions before you commit to a full makeup application.
How to Test Makeup Looks With Betatum AI Makeup
Ready to explore new makeup looks without applying and removing each one? Betatum AI Makeup lets you preview different styles on your own photo, making it easier to compare colours, placement and complete makeup aesthetics before reaching for your products.
Follow these 10 practical steps to create more useful and realistic AI makeup previews:
Choose a clear, front-facing photo: Select a sharp image in which your full face is clearly visible. Keep your head straight, pull your hair away from your eyes and cheeks, and avoid sunglasses, heavy shadows or anything else that hides your features.
Use natural, even lighting: Choose a photo taken near a window or in soft daylight. Strong yellow, blue or coloured lighting can alter the appearance of your skin tone and make makeup shades more difficult to judge accurately.
Avoid filters and heavy existing makeup: Start with an unfiltered photo and little or no makeup whenever possible. Beauty filters, skin smoothing and strong existing makeup can affect how accurately the AI detects your features and applies the new look.
Upload your photo to Betatum AI Makeup: Open Betatum AI Makeup and upload your selected image. The system detects areas such as the eyes, brows, cheeks, lips and complexion before digitally applying the chosen makeup style.
Choose one makeup direction: Begin with a clear aesthetic, such as fresh natural makeup, romantic makeup, soft glam, smoky eyes or a bold lip. Testing one complete direction at a time makes the results easier to understand and compare.
Generate noticeably different looks: Avoid creating several previews that look almost identical. Compare different colour families, finishes and levels of intensity so you can see which direction produces the effect you want.
Inspect the placement carefully: Look closely at the eyeliner, eyeshadow, brows, blush, contour and lip borders. Check that the digital makeup follows your features naturally and does not extend into the hair, teeth or surrounding skin.
Evaluate the complete face: Do not judge the lipstick, blush or eye makeup in isolation. Consider whether the colours and placement feel balanced across the whole face and whether one feature unintentionally overpowers the others.
Save the most useful previews: Keep two or three results that show genuinely different options. These images can act as visual references when choosing products, colours or placement techniques for the real application.
Test your favourite look in real life: Recreate a simplified version using products you already own. Check the result in natural light and take an ordinary, unfiltered phone photo to compare the real application with the AI preview.
Betatum AI Makeup can help you explore ideas and narrow down your options, but the preview should not be treated as an exact prediction of the final result. Real products may appear different depending on their pigmentation, texture, coverage and finish, as well as your skin and the lighting around you.
Turn an AI Preview Into a Makeup Look You Can Actually Wear
An AI preview can show you the overall direction, but real makeup needs to be adapted to your skin, products and everyday lighting. Use the preview as a reference rather than trying to copy every digital detail exactly.
Name the final makeup direction
Decide whether the look is natural, romantic, soft glam, smoky or bold. Giving it a clear category makes it easier to choose suitable products and avoid mixing too many unrelated ideas.Choose one focal feature
Decide where you want the strongest emphasis to be: the eyes, lips or complexion. A clear focal point usually creates a more balanced result than applying the same level of intensity everywhere.Identify the main colour family
Look at the shades used across the preview and note whether the overall direction is rose, peach, berry, bronze, brown or neutral. You do not need an exact colour match; focus on finding real products with a similar depth and undertone.Map the placement
Study where the blush begins and ends, how the contour follows the face, where the highlight is concentrated and how far the eyeshadow extends. Placement often influences the final result more than copying the exact product colour.Choose a realistic finish
Decide whether the look should be matte, satin, natural or dewy. Adapt the finish to your skin rather than copying a perfectly smooth or highly reflective digital effect that may not translate well in real life.Reduce the intensity when necessary
Virtual makeup may appear stronger so that the colours remain visible on screen. Begin with less product than the preview seems to show, then build the intensity gradually until the result feels balanced.Recreate one half of the face first
Apply the look to one side of your face while leaving the other side unmade-up. This creates a direct comparison and makes it easier to judge whether the colour, placement and definition genuinely improve the effect you want.Check the result in natural light
Move near a window and examine the makeup in daylight. Pay particular attention to the foundation shade, jawline, blush intensity and lip colour, as these can look very different under indoor lighting.Take an ordinary phone photo
Use an unfiltered camera and hold the phone at a normal distance from your face. Compare the real application with the AI preview and notice which details translated well and which ones need adjusting.Complete a wear test
Wear the look for several hours before using it for an important occasion. Check whether the base separates, the eyeshadow creases, the colour fades or the lipstick becomes uncomfortable.
Do not try a completely new makeup look for the first time on the day of an event. Testing it beforehand gives you time to adjust the shades, finish and placement until the result feels comfortable, practical and recognisably yours.
Match the Makeup Look to the Occasion
The makeup look that suits you best also depends on where you are going, how long you plan to wear it and how it will appear under different lighting conditions. When testing styles with Betatum AI Makeup, begin with the occasion so you can compare each preview based on practicality, balance and the effect you want to create.
Occasion | Base and Finish | Eyes | Cheeks | Lips | Main Goal |
|---|---|---|---|---|---|
Everyday | Lightweight base with a natural finish | Mascara with soft definition | Fresh, subtle blush | Tinted or muted shades | Keep the look comfortable, natural and easy to maintain |
Work or interview | Natural or satin finish | Clean, moderate definition | Soft, controlled colour | Neutral or soft rose | Create a polished look that does not feel overdone |
Date night | Natural glow | Soft smoky eyes or lifted eyeliner | Blended definition | Nude, rose or a statement lip | Create one clear focal feature |
Wedding guest | Long-wear, photo-friendly base | Defined eyes without excessive glitter | Balanced blush and subtle contour | Comfortable, long-wear colour | Look polished both in person and in photographs |
Evening event | Controlled luminous or matte finish | Deeper eyeshadow or bolder eyeliner | More visible definition | A shade balanced with the eye makeup | Keep the features visible under lower lighting |
Photo or video | Even complexion with controlled shine | Slightly stronger definition | Visible but carefully blended | Enough contrast to remain visible on camera | Prevent the features from appearing washed out on screen |
Creative event | Flexible finish based on the concept | Graphic liner or colourful eye makeup | Coordinated with the overall style | Bold or unconventional shades | Express personality and support the creative theme |
When comparing AI-generated previews, focus on whether the makeup works for the occasion rather than automatically choosing the most dramatic result. A bold smoky eye may feel appropriate for an evening event but too intense for a professional interview. In contrast, a very subtle everyday look may lose definition under photography or video lighting.
Use these suggestions as starting points, then adjust the colour, intensity and finish according to the dress code, lighting, expected wear time and your personal style.
Common Mistakes When Choosing a Makeup Look
Choosing the right makeup look is not only about following face-shape rules or copying popular trends. Your features, colouring, skin texture, personal style and the occasion all influence how a look works. Avoid these common mistakes when testing makeup ideas with Betatum AI Makeup.
Choosing Makeup Based on Face Shape Alone
Face shape is only one part of the picture. Focusing on it alone can cause you to overlook your eye shape, colouring, skin texture, personal style and the occasion.
Better approach: Combine facial structure with colour, finish, texture and the effect you want to create.
Copying a Celebrity Makeup Look Exactly
A celebrity may have different features, colouring and natural contrast. Professional lighting, filters and editing can also change how the makeup appears.
Better approach: Use the look as inspiration, then adapt its colour, placement and intensity to your own face.
Treating Every Recommendation as a Strict Rule
Real faces often combine several shapes and characteristics, so one formula will not work equally well for everyone.
Better approach: Use makeup advice as a starting point. Experiment with different techniques and keep the elements that suit you best.
Testing Only One AI-Generated Result
A single preview gives you nothing meaningful to compare. It may also seem like the best option simply because it is the only result you have seen.
Better approach: Test at least three clearly different directions, such as natural makeup, soft glam and a bold-lip look.
Uploading a Filtered Selfie
Filters can change your skin tone, texture, facial proportions and the shape of your eyes or lips. This may make the AI preview less realistic.
Better approach: Upload an original, unedited portrait with clear lighting and visible facial features.
Changing Every Makeup Element at Once
If you change the lipstick, blush, eyeshadow, brows and finish together, it becomes difficult to identify which adjustment improved or weakened the look.
Better approach: Change one variable at a time, such as lipstick colour, blush placement or makeup intensity.
Confusing Bronzer With Contour
Bronzer adds warmth and creates a sun-kissed effect, while contour mimics natural shadows to add depth and definition. Using one instead of the other can produce an unintended result.
Better approach: Choose bronzer when you want warmth and contour when you want more structure or definition.
Ignoring Finish and Skin Texture
Even a flattering colour may not look suitable if its finish does not work well with your skin. Heavy shimmer, thick matte products or excessive dewiness can draw attention to areas you did not intend to emphasise.
Better approach: Match matte, satin, shimmer or dewy finishes to your skin, comfort level and desired result.
Choosing a Look Only Because It Is Trending
A popular makeup style may not suit your features, lifestyle, comfort level or the occasion for which you need it.
Better approach: Treat trends as inspiration and adapt them to your personal style and everyday needs.
Expecting an Exact Product Match From an AI Preview
Digital colours cannot fully reproduce every real formula, undertone, finish, pigmentation level or lighting condition.
Better approach: Test the physical product before buying it or relying on it for an important event.
Treating AI as a Beauty Score
AI-generated results may reflect narrow, edited or unrealistic beauty standards. A preview that looks different does not mean your natural face needs correction.
Better approach: Use AI for experimentation and inspiration—not as a judge of attractiveness.
The most useful makeup advice should help you experiment with greater confidence—not pressure you to follow every trend or beauty rule. Use Betatum AI Makeup to explore different possibilities, compare how they look on your face and identify the direction that feels most like you.
Conclusion
Finding a makeup look that suits you involves more than following one rule. Face shape can guide placement, undertone can help with colour choices, eye shape affects how liner and shadow appear, and skin texture influences which finishes look most natural. The occasion also determines how subtle or dramatic the makeup should be, while your personal style decides whether the final result feels authentic. AI can make experimentation faster by helping you compare different directions on the same face, but the final decision should always be yours. Not sure whether soft glam, bold lipstick or a more natural look suits you? Upload a clear portrait to Betatum AI Makeup, compare different styles on your own face, and use the checks above to choose a look that still feels like you.