Remove Text From an Image Without Background Damage
By Maria · 2026-08-07
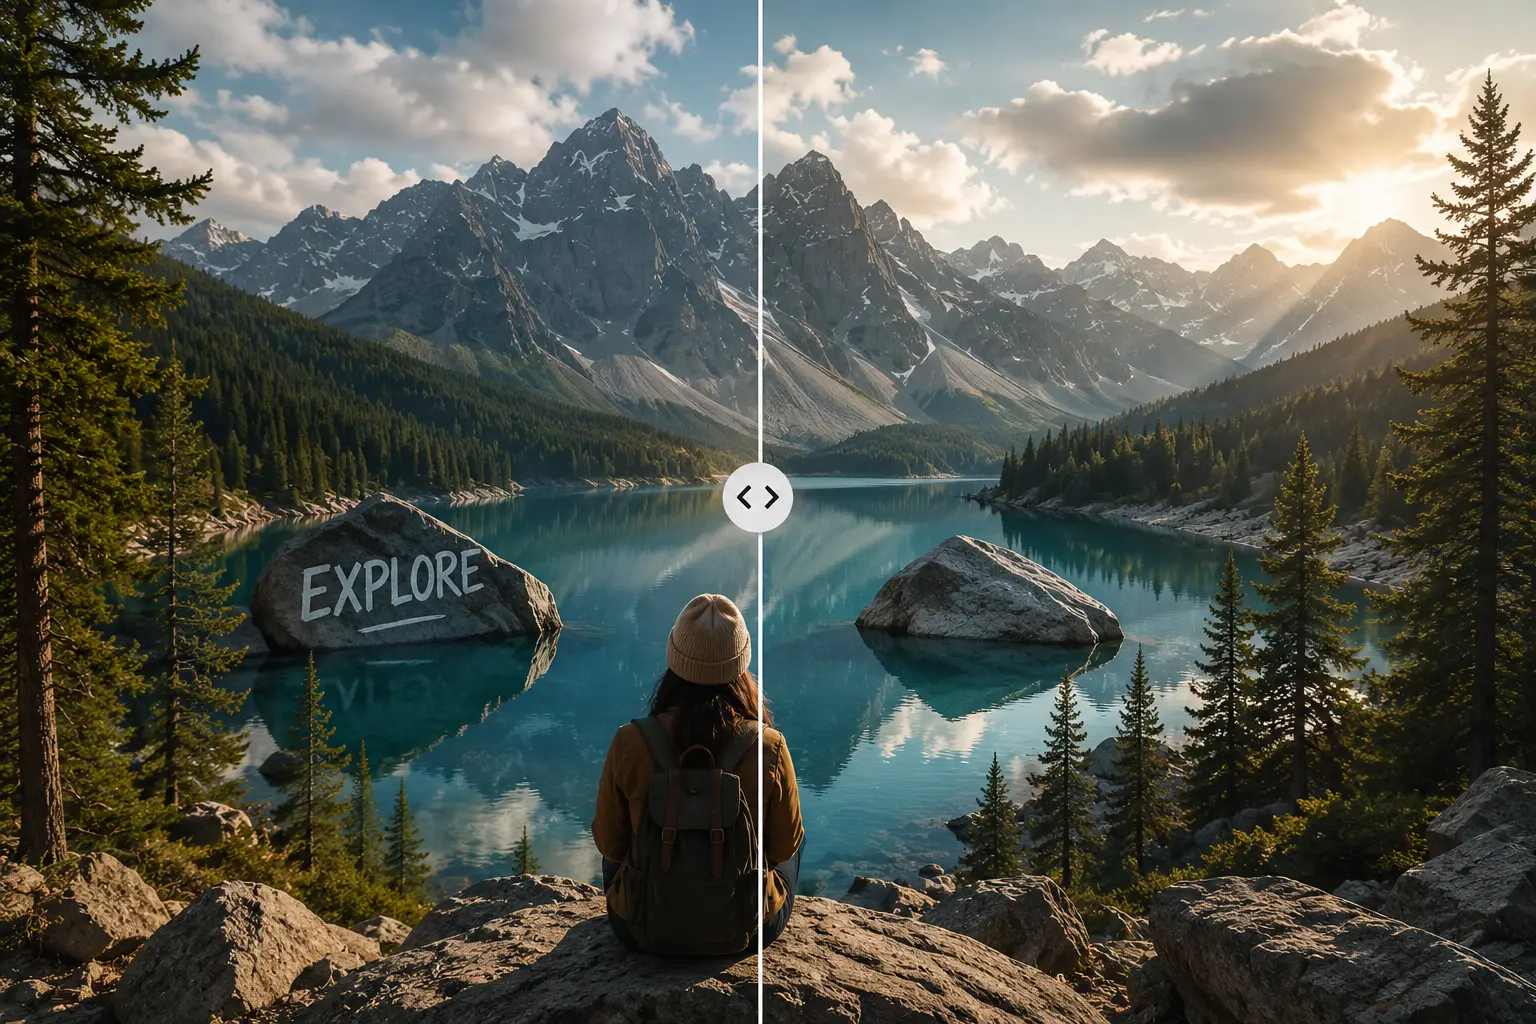
Removing text isn't just about erasing letters—it's about rebuilding the background naturally. This guide explains how AI text removal works, when it succeeds, when manual editing is still needed, and how to get cleaner results with Betatum AI Object Removal.
You remove a date stamp, a watermark, or a price tag from a photo, but the result still looks off. Instead of a clean background, you’re left with a blurry patch, broken lines, or colors that don’t match the rest of the image.
The problem is that removing text from an image is not just one task — it’s two. First, the text has to be detected and erased. Second, and more importantly, the area behind the text needs to be reconstructed so it looks natural. Most tools can handle the first part reasonably well, but the second part is where things usually go wrong. The AI doesn’t reveal a hidden original background; it tries to guess what should be there based on the surrounding area.
In this guide, you’ll learn how to judge whether text can be removed cleanly, how to prepare your image, how to erase the text properly, and how to fix any remaining texture or lighting issues. We’ll also cover when AI works well and when manual editing is still necessary, plus which types of text you should avoid removing without permission.
Summary
Removing text from an image successfully is a two-step process: erasing the text and reconstructing the background. Since AI tools cannot restore hidden pixels, they guess and rebuild the missing area using surrounding colors and textures. To get a clean, natural result using Betatum AI Object Removal, paint precisely over the text, process it in small sections, and inspect the details at 100% zoom. While plain backgrounds are easy to fix, complex surfaces like patterns, skin, or reflections may require manual touch-ups with the Clone Stamp. Finally, always respect copyright and avoid removing watermarks or legal info without permission.
Can Text Really Be Removed Without Damaging the Background?
Yes, text can often be removed without visibly damaging the background , but only when the area around the text has clear, repeatable visual information. The key point is that no tool can recover pixels that were never captured beneath the text. What AI tools actually do is create a plausible reconstruction based on the surrounding textures, colors, shapes, and lighting.
Success depends on several factors:
Image resolution
Size of the text
How complex the background is
How much contrast the text has with the background
How much clean background is visible around the text
Whether the text overlaps important edges or objects
Image compression and blur
How accurately you select the text
It’s also important to understand the difference between a result that is technically text-free and one that actually looks natural. Just because the letters are gone doesn’t mean the edit looks believable. In many cases, the real challenge is making the repaired area blend in so well that no one can tell anything was changed.
First, Find Out What Kind of Text You Are Editing
Not all text is the same. Before you start removing anything, it helps to understand which type of text you’re dealing with, because the method and difficulty can change completely depending on how the text was added.
Editable Text on a Separate Layer
If you have access to the original layered file — such as a PSD, Canva design, or any template where the text sits on its own layer — this is the easiest case. Simply select the text layer and delete or hide it. Since the text was never part of the background, you won’t need any reconstruction. Always check if an editable source file exists before using an AI tool.
Flattened Overlay Text
This includes text that has been permanently merged into the image, such as captions, date stamps, social media usernames, subtitles, watermarks, or promotional messages on JPG or PNG files. Once the text is flattened, it becomes part of the image pixels. Removing it requires inpainting or generative tools to rebuild the area underneath.
Text That Exists Inside the Scene
This type of text is part of the original photo — for example, signs on buildings, text on product packaging, clothing prints, book covers, vehicle license plates, or writing on walls. Scene text is usually the hardest to remove cleanly because it follows perspective, surface texture, curvature, reflections, shadows, and material details. The background behind this text is rarely simple or uniform, which makes natural reconstruction more difficult.
What Happens to the Background After the Text Is Removed?
When you remove text with an AI tool, the software doesn’t uncover hidden pixels that were underneath the letters. Instead, it uses a process called inpainting. Here’s what actually happens:
The tool first creates or receives a mask around the text you want to remove. It then studies the area surrounding that mask and predicts what colors, textures, lines, and shapes would fit naturally in the empty space. After that, it fills the masked area with new pixels and blends them with the surrounding image.
Most modern tools, including Adobe’s generative features, work by analyzing “the textures, colors, and patterns around selected text” and then generating a replacement area that tries to match the rest of the image.
It’s important to understand the difference between two terms:
Recovery means restoring original information that still exists in the file.
Reconstruction means creating new pixels that only look like they belong there.
In almost all cases of text removal, you’re doing reconstruction, not recovery. The AI is guessing what should be there based on the visible surroundings.
Which Text Is Easy or Difficult to Remove?
Some types of text are much easier to remove cleanly than others. Here’s a quick comparison:
Usually Easier | Usually More Difficult |
|---|---|
Small text against a plain wall | Large text covering most of the image |
Captions over sky, sand or blurred areas | Text crossing a face or body |
Date stamps near an image edge | Writing over hair, fur or foliage |
Text over a consistent color | Text over detailed patterns |
Words surrounded by visible texture | Text covering unique objects |
Text away from the main subject | Curved text on bottles or packaging |
High-resolution, sharp images | Compressed screenshots or blurry images |
Simple horizontal text | Rotated or perspective-distorted text |
Thin text with clear contrast | Shadows, outlines and glow effects |
Text over repeatable brick or tiles | Reflective, transparent or metallic surfaces |
Keep in mind that “difficult” doesn’t mean impossible. It simply means the edit may need smaller selections, multiple attempts, or some manual corrections to look natural.
How to Remove Text Without Ruining the Background
AI Object Removal is designed to let you simply paint over unwanted text and erase it from the image. The tool uses AI to reconstruct the background behind the text. Follow these steps for better results:
Upload your image to Betatum AI Object Removal.
Use the brush tool to paint over the text you want to remove. Try to cover the letters cleanly without going too far outside the text area.
Adjust the brush size as needed for more precise control, especially around edges.
Click the remove button and let the AI process the area.
If the result is not perfect, undo and repaint the area more carefully, or make smaller selections in complex parts.
Check the Result at Two Zoom Levels
After the text is removed, always review the image at two different zoom levels:
Zoom in to 100% to check for texture problems, color mismatches, or pixel-level issues.
View the image at fit-to-screen size to see if the edit looks natural from a normal viewing distance.
An area might look acceptable when zoomed out but show problems at full resolution, or it may look slightly imperfect up close but remain unnoticeable at normal size.
Export Once in the Right Format
Once you’re satisfied with the result, save an editable or high-quality master file first. Then export a final delivery copy based on where the image will be used. Avoid repeatedly opening and saving JPEG files, as this can reduce image quality over time.
How to Protect Difficult Backgrounds
Some backgrounds need extra care during text removal. Here’s how to handle the most challenging ones:
Repeating Patterns, Tiles, Brick and Fabric
When removing text from repeating surfaces, follow the direction and spacing of the original pattern. Watch out for problems like duplicate bricks, uneven tile spacing, broken seams, mirrored textures, or repeated fabric marks. In these cases, use the AI tool for the first pass, then switch to the Clone Stamp tool for precise geometric corrections.
Faces, Skin, Hair and Clothing
These areas are highly sensitive. Even small changes can affect identity, expression, hairline, or clothing shape. Use narrow selections and make multiple controlled passes instead of removing large areas at once. Avoid removing text that overlaps facial features, fingers, jewelry, or garment edges.
Gradients, Sky, Walls and Blurred Backgrounds
Although these backgrounds often look simple, poor fills can create visible issues such as color bands, uneven noise, noticeable patches, sudden blur changes, or mismatched grain levels. Always check color and noise continuity after the removal.
Reflective, Transparent and Curved Surfaces
Glass, metal, plastic packaging, screens, and bottles require special attention. The replacement area must preserve reflections, highlights, curvature, transparency, object contours, and lighting direction. Remove the text in small sections that follow the surface shape rather than trying to erase everything at once.
Text Crossing Object Edges
When text overlaps two different surfaces (for example, partly on a shirt and partly on the wall behind it), the editor needs to reconstruct each region separately. Mask and repair each area independently to keep the boundary between objects clean and natural.
Common Text Removal Problems and How to Fix Them
Even with good tools, text removal doesn’t always go perfectly on the first try. Here are the most common problems and how to fix them:
Problem | Likely Cause | Better Approach |
|---|---|---|
Ghost letters remain | Mask did not include outlines or shadows | Expand the selection slightly |
The area looks blurry | Mask was too large or source was low-resolution | Use smaller passes and a better original |
Background lines are broken | AI ignored structural edges | Rebuild lines with Clone Stamp or a precise selection |
Texture repeats unnaturally | Tool copied the same nearby area | Generate again or clone from multiple sources |
A nearby object changed shape | Selection touched the object | Undo and use a smaller brush |
Colors do not match | Fill used a different lighting or gradient | Adjust color locally or regenerate |
The patch is too smooth | Texture or grain was removed | Add matching grain or copy nearby texture |
Part of the punctuation remains | Small marks were missed | Inspect at 100% zoom |
Reflections disappear | Text and reflection were treated as one area | Reconstruct the reflection separately |
The whole image loses quality | Excessive compression during export | Return to the master and export once |
New objects appear | Generative AI invented content | Use a neutral prompt or a non-generative repair method |
The edited region looks sharp but fake | Perspective or pattern spacing is wrong | Match structural direction, not only sharpness |
Practical Use Cases for Removing Text From Images
Here are some common situations where removing text from images is useful:
Removing old promotional copy from marketing assets
You can update outdated offers or slogans on existing images without reshooting. Always make sure the original message wasn’t legally required or part of any contract.
Updating dates and prices
Change expired dates or incorrect prices on product images and ads. Never alter information that could mislead customers about current offers or safety details.
Cleaning social media images
Remove usernames, hashtags, or watermarks before reposting. Avoid removing any text that identifies the original creator if it affects attribution rights.
Removing personal information from screenshots
Hide names, phone numbers, or email addresses before sharing. Be careful not to remove context that could be important for legal or safety reasons.
Preparing product photos for a new campaign
Clean old labels or text from product images when launching updated versions. Ensure the removed text doesn’t include mandatory safety or regulatory information.
Correcting text added to an old family photo
Remove unwanted captions or dates from scanned family pictures. Only edit text that was added later and not part of the original historical record.
Reusing a background or template
Remove temporary text from reusable design templates. Confirm that the background itself doesn’t contain protected branding or copyrighted elements.
Localizing visual content
Replace text in one language with another for different markets. Never remove original text if it’s required for compliance or consumer protection in any region.
Cleaning presentation images
Remove speaker notes, watermarks, or temporary labels from slides. Make sure the cleaned image still accurately represents the original content.
Removing accidental camera date stamps
Erase date stamps that appear on old photos. Only do this when the date is not important for documentation or legal purposes.
Redesigning posters when the source file is missing
Update text on printed posters by editing the final image. Avoid changing any information that could be considered misleading or legally binding.
Conclusion
Removing text from an image works best when you follow a clear and careful process. Always start with the highest-quality original file available. Before editing, identify whether the text is editable on a separate layer, flattened into the image, or part of the actual scene. When selecting the text, be precise and avoid removing more background than necessary. After the AI processes the area, carefully review the texture, edges, lighting, and patterns to make sure the edit looks natural. Finally, save the original file and export a separate final version for use.
Need to remove unwanted text, captions or date stamps from an image? Try Betatum AI Object Removal, compare the result with the original and refine any detailed areas before publishing.