
How to Enhance Real Estate Photos That Make Buyers Click
By Maria · 2026-11-08
Learn how to enhance real estate photos: fix lighting, color, and perspective, know when to retake, and choose a cover photo that highlights the property.
A room can look bright and welcoming in person, yet tell a different story in a real estate listing. The photos might appear too dark, the walls may look tilted, or warm lighting could leave everything with a yellow tint. These small issues can make it harder for buyers to appreciate the space.
Fortunately, not every photo needs to be taken again. In this guide, you'll learn how to enhance real estate photos, recognize when a new shot is necessary, and choose a cover image that presents the property clearly.
summary
Improving property photos is about making thoughtful choices, from selecting the right images to preparing a gallery that represents the home accurately. Here's what you'll discover:
Edit or retake? Which photo problems are worth fixing, and when a new shot is better.
Essential improvements: Lighting, perspective, color, and sharpness.
AI editing options: When object removal, upscaling, or virtual staging helps.
Listing prep: Choosing a cover photo and keeping the gallery consistent.
Before You Edit: Improve This Photo or Retake It?
Before starting any real estate photo editing, take a closer look at the original image. Some problems can be fixed without another photo shoot, while others are better addressed with a new shot. Always work with the original, highest-quality file available and save an untouched copy before making changes. The table below can help you decide whether a photo is worth improving or should be retaken.
Photo issue | Edit or retake? |
|---|---|
The room looks slightly dark | Edit: The lighting may be improved. |
Walls or furniture have a yellow tint | Edit: The color cast can usually be corrected. |
Vertical lines appear slightly tilted | Edit: Minor perspective issues may be corrected. |
The image is severely blurred or out of focus | Retake: Editing cannot reliably restore missing details. |
The angle hides an important part of the room | Retake: A new viewpoint is needed to show the missing space. |
How to Enhance Real Estate Photos, Step by Step
Learning how to enhance real estate photos doesn't mean applying every available adjustment. The goal is to make each room look clear and inviting without changing its actual appearance.
Imagine you're working with a living room photo where the door frame looks slightly tilted, the furniture is too dark, and the lighting gives the walls a yellow tint. The window also appears overly bright, while darker areas look a little grainy. We'll use this same photo to walk through five practical corrections. Apply only the ones your image needs.
Straighten Walls and Door Frames
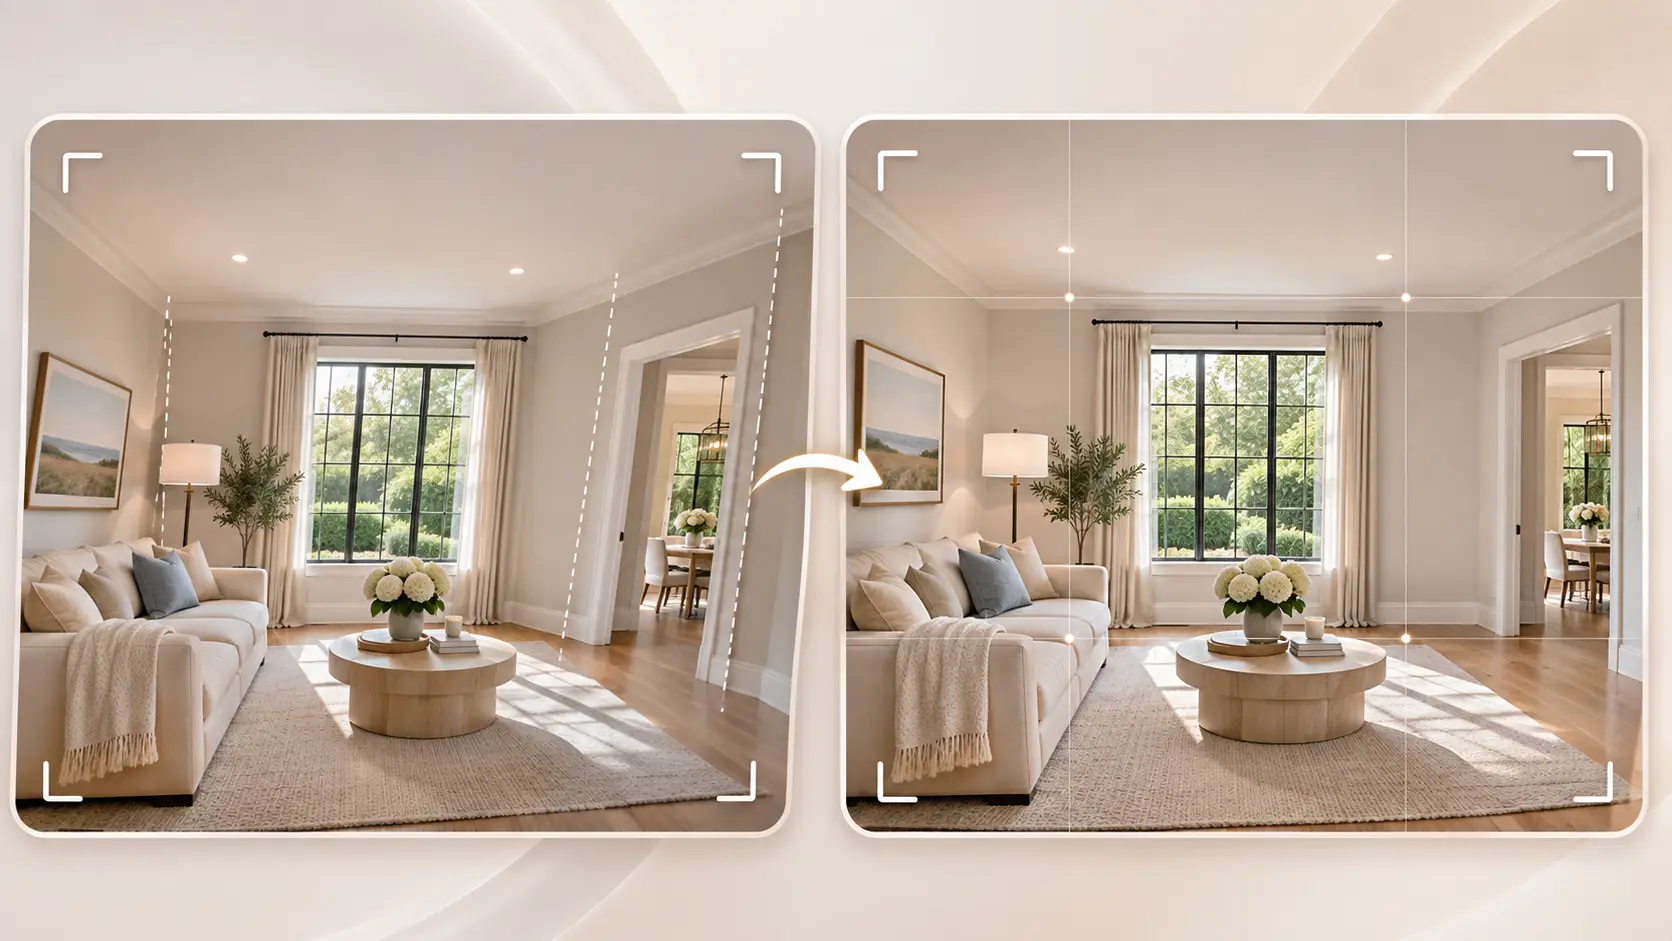
A slightly tilted camera can make door frames lean and walls look uneven, even when the room itself is perfectly straight. This is often one of the first things worth checking in a property photo.
Start by comparing the vertical edges of doors, windows, and walls. If the entire image is tilted, a small rotation may straighten it. But if vertical lines seem to lean inward or outward, you may need perspective correction instead.
Use the room's architectural lines as your guide, and check the edges after making adjustments. Straightening can require cropping, so make sure important features haven't disappeared.
After correcting the perspective, take another look at the furniture and overall room proportions. If the sofa appears stretched or the room looks unusually wide, you've probably gone too far with the adjustment.
Brighten Dark Rooms Without Losing Detail
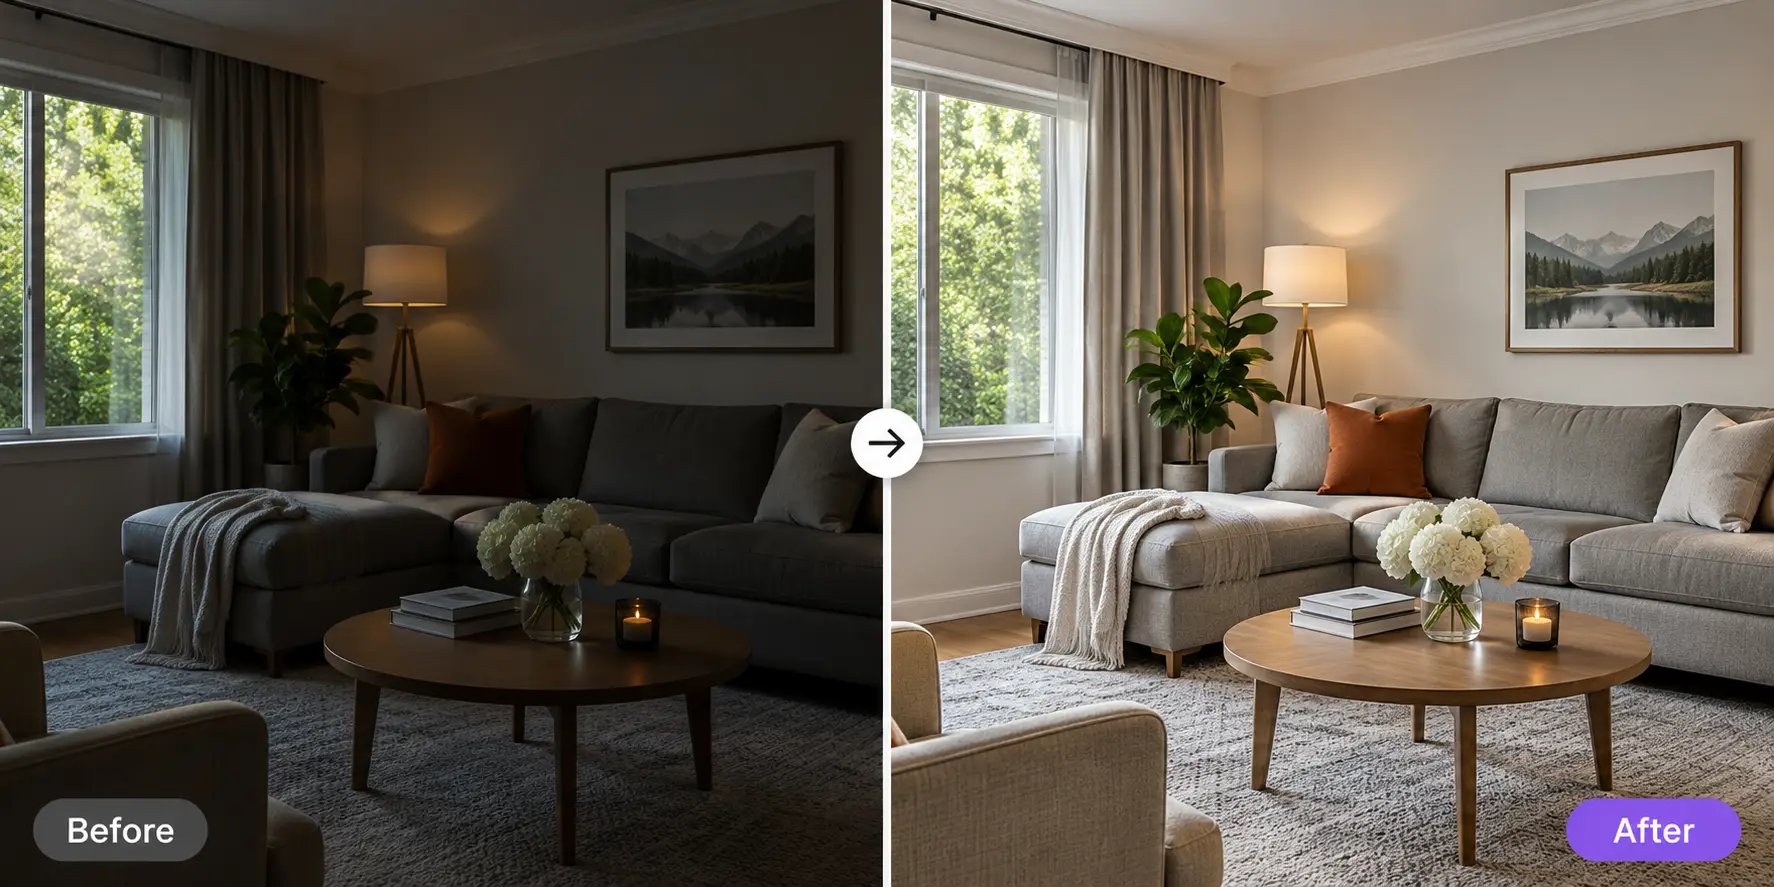
In our living room example, the sofa and corners are difficult to see, even though daylight is entering through the window. The aim is to make those areas more visible without turning the entire photo unnaturally bright.
If your editor provides exposure, shadows, and highlights controls, use them according to what the image needs. Exposure changes the overall brightness, while shadow adjustments can reveal darker furniture and corners. Highlight adjustments may help preserve detail in brighter surfaces and windows.
Compare the edited image with the original. A good adjustment should make the room easier to see while keeping natural differences between light and shadow.
There's no need to make every corner equally bright. Keep some natural shadows to preserve the room's depth, and avoid pushing the brightness so far that walls lose detail or grain becomes more noticeable.
Remove Unwanted Color Casts
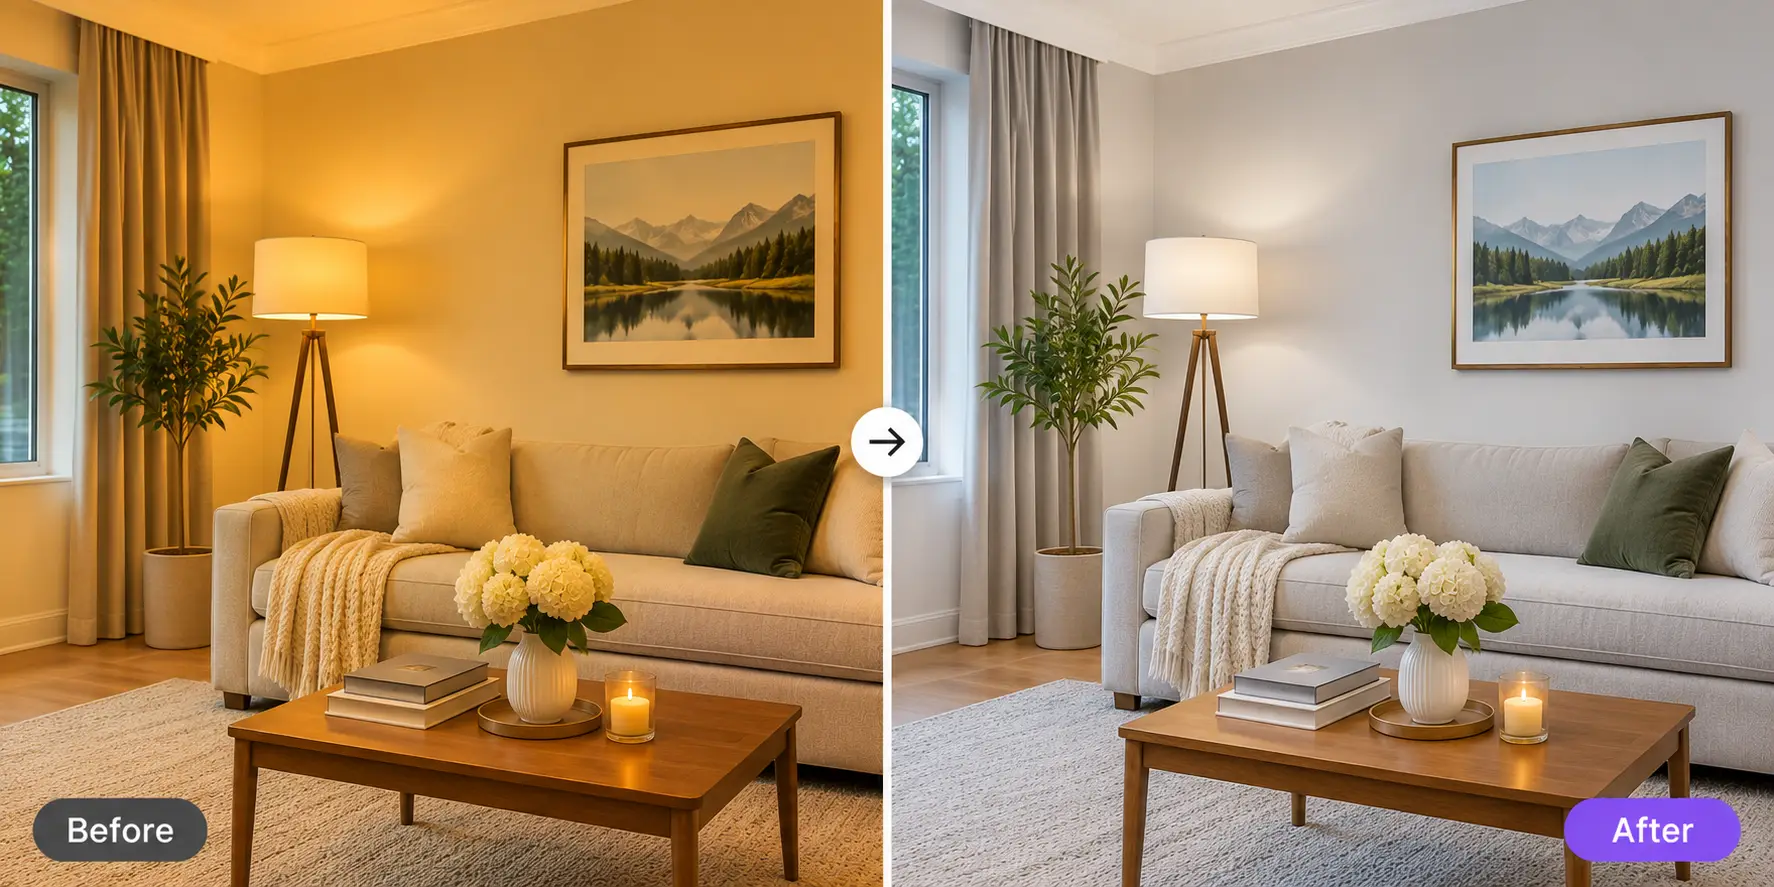
Indoor lighting can change how a room's colors appear in photos. Warm bulbs may give white surfaces a yellow or orange tint, while other lighting conditions can introduce blue, green, or magenta tones.
In our example, the living room walls look noticeably yellow. White balance adjustments can help correct this. Look for a surface you know should be neutral, such as a white door frame or a gray countertop, and use it as a reference when adjusting color temperature and tint.
Rooms with both daylight and artificial lighting can be more challenging. If one area looks neutral while another still has an unwanted tint, an editor with local color adjustments may help correct them separately.
Before moving on, compare the corrected colors with the actual room. A wooden floor should still look like the same wood, and painted walls shouldn't lose their original shade just to make the photo appear more neutral.
Bring Back Window Details Where Possible
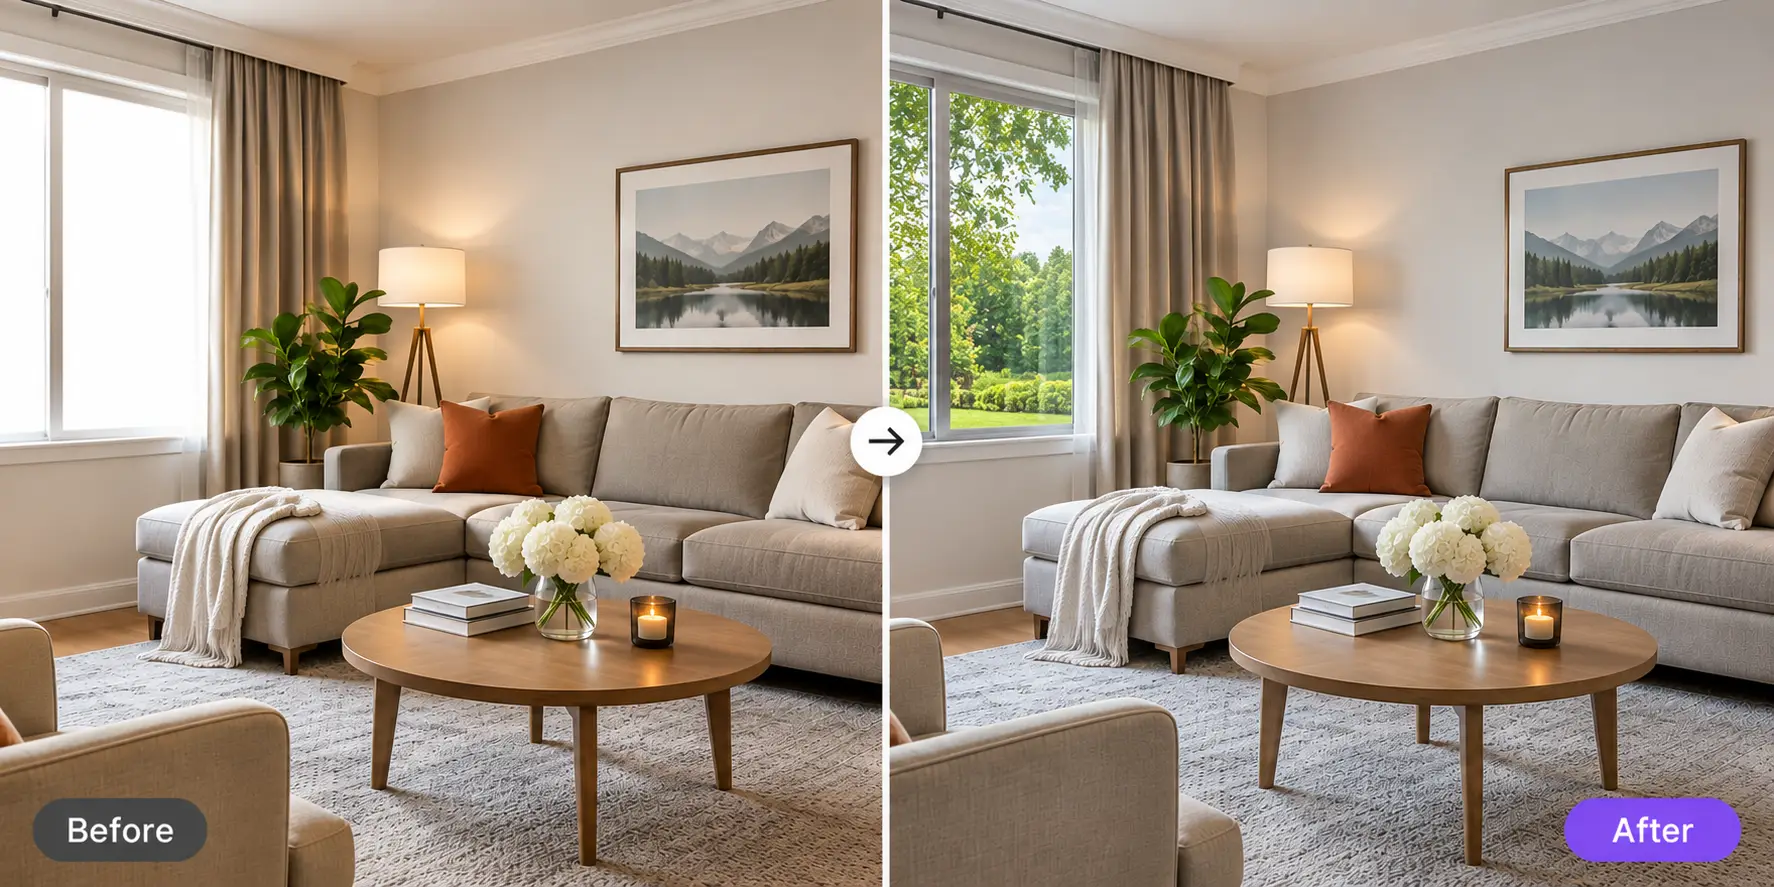
Bright windows are another common challenge in real estate photos. In our living room example, the interior is visible, but the view through the window looks almost completely white.
If the original file still contains usable highlight detail, reducing highlights may reveal some of the view. However, editing cannot recover scenery that the camera never recorded.
If you captured several exposures of the same scene at different brightness levels, HDR merging may help combine interior and exterior details into one balanced image. This works best when the shots are properly aligned and the scene hasn't changed significantly between exposures.
If the window is completely overexposed and no usable detail remains, another exposure or a reshoot is the more reliable option.
The important distinction is whether you're revealing something the camera captured or creating something that wasn't there. If the original contains no usable window detail, adding a generated outdoor view would misrepresent the property.
Reduce Noise and Improve Image Sharpness
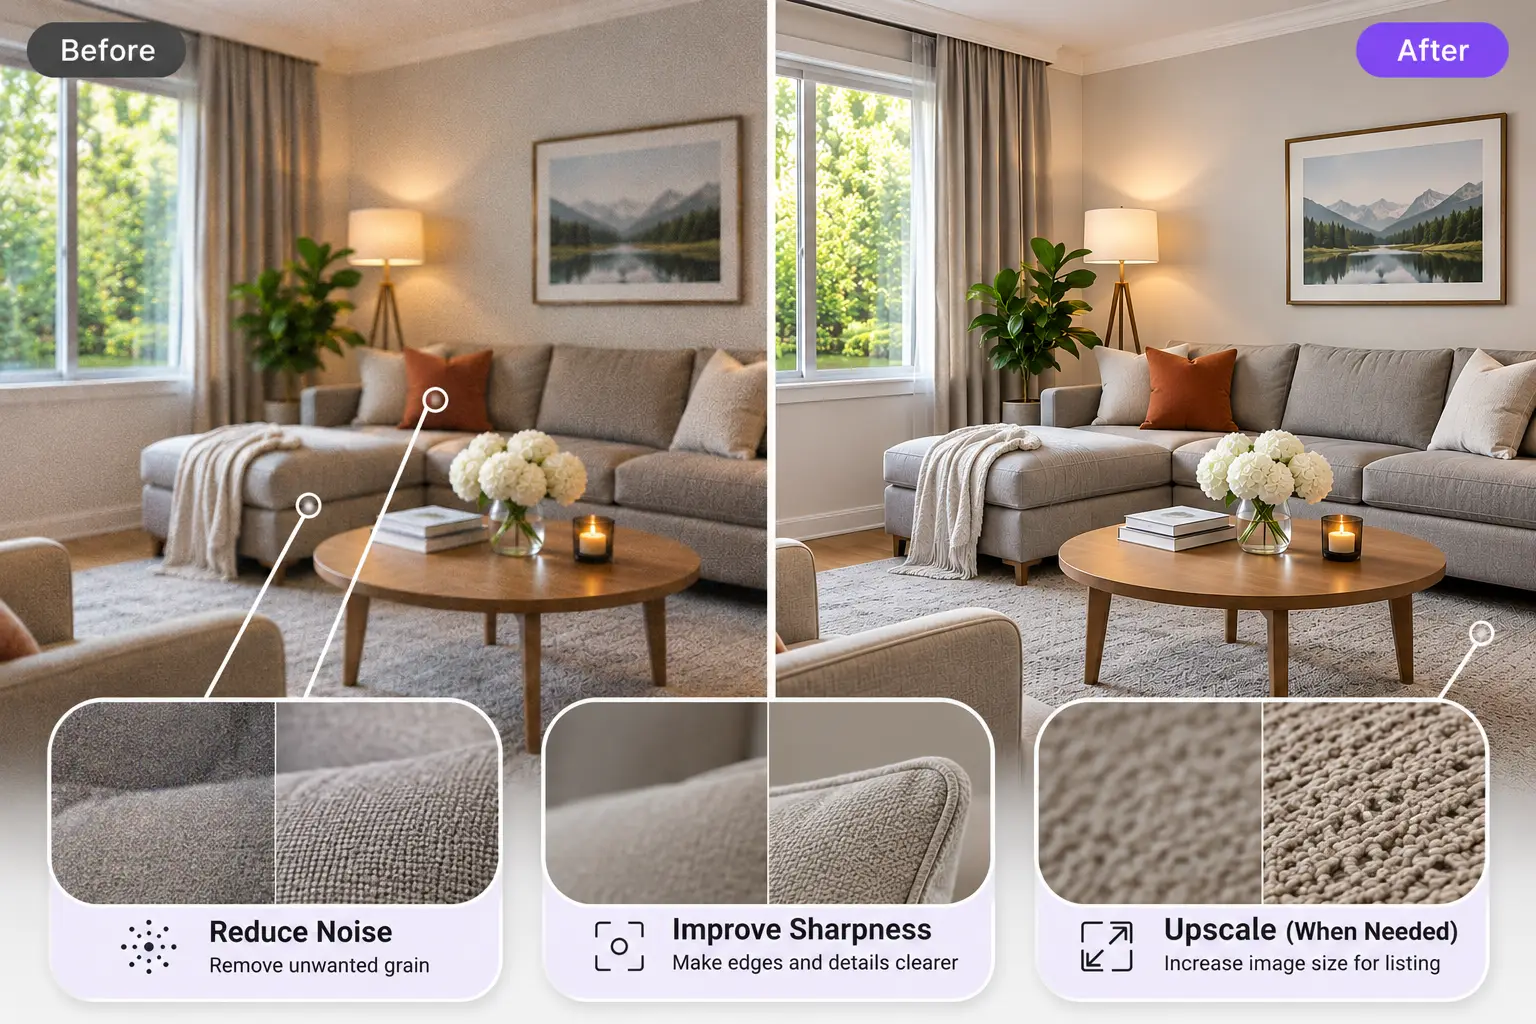
After adjusting the lighting, you might notice grain in the darker parts of the living room or slightly soft edges around the furniture. These problems need different corrections.
Noise reduction helps smooth unwanted grain, while sharpening increases the visibility of existing edges and fine details. Upscaling serves another purpose: increasing image dimensions when the original file is too small for its intended use.
Apply noise reduction and sharpening moderately, then inspect areas with recognizable textures. Wood grain should still look natural, window frames shouldn't develop bright outlines, and floor tiles should keep their original patterns.
If the photo needs larger dimensions for a listing layout or display, AI Photo Upscaler can help create an enlarged version. However, upscaling cannot guarantee accurate recovery of details missing from the original photo.
More processing doesn't always mean a better image. If wooden surfaces start looking unnaturally smooth or bright halos appear around window frames, reduce the strength of your adjustments. Check the result at the size it will actually be displayed.
Remove Clutter Without Hiding Damage
A few distracting items can make an otherwise attractive room look messy. Before taking photos, it's best to tidy the space by removing personal belongings, loose cables, and other unnecessary objects. But what if the photos have already been taken?
For existing images, AI Object Removal can help remove suitable distractions, provided the changes follow the listing platform's publishing rules. The key is knowing what should and shouldn't disappear.
For example:
A personal item on a table: A water bottle or set of keys can be removed because it isn't a permanent part of the property.
A damp stain on a wall: This should remain visible because it may indicate a property defect that buyers need to know about.
After removing an object, examine the edited area carefully. AI may reconstruct the background with distorted textures, repeated patterns, or unnatural shadows. If the result looks unrealistic, reconsider the edit or use a cleaner original photo.
The goal is to present a tidy room, not conceal its actual condition.
When Should You Use Virtual Staging?
Not every real estate photo needs virtual staging. Sometimes, correcting the lighting or straightening the walls is enough to improve listing photos. These edits refine the existing image, while virtual staging changes how the room's furnishings are presented.
The right approach depends on what the room already contains and what you want to show potential buyers.
Situation | Recommended approach |
|---|---|
The room looks dark or tilted | Correct lighting and perspective using an editor with the appropriate controls. |
A furnished room needs a different interior style | Consider Betatum AI Virtual Staging to explore a new furnishing style. |
An empty room needs a furniture visualization | Use Betatum AI Generative Fill to add furniture to selected areas. |
Virtual staging can help buyers imagine how a space might look with different furniture, but it shouldn't misrepresent the property. Compare the edited image with the original to make sure permanent features, such as windows, doors, walls, and built-in fixtures, remain accurate.
Before publishing, check the applicable listing rules and disclosure requirements. If an image has been virtually staged, label it where required so buyers can distinguish the visualization from the property's actual condition.
Choose a Cover Photo That Shows the Property’s Best Feature
Your cover photo is often the first image buyers see when browsing property listings, so it should give them a clear reason to explore further. Instead of automatically choosing the living room or exterior, look for the photo that best represents what makes the property appealing.
Start by comparing two or three candidates at thumbnail size, just as they might appear in search results. An inviting exterior could work well for a house with strong curb appeal, while a bright, spacious living room might be a better choice for an apartment. If the property has a distinctive architectural feature, consider whether that deserves the spotlight.
Before deciding, check that the image is bright enough, the composition draws attention to the main feature, and important details remain visible after the listing platform crops it.
The best cover photo isn't necessarily the most dramatic one. It's the one that shows buyers something valuable about the property at a glance.
Keep Lighting and Colors Consistent Across the Listing
A single well-edited photo isn't enough if the rest of the listing looks noticeably different. When reviewing your real estate photos, look at them together rather than judging each image separately.
Compare surfaces that appear in multiple shots, such as wooden floors, kitchen cabinets, and painted walls. Their colors should remain consistent from one photo to another. For example, a wooden floor shouldn't look warm brown in the living room and gray in the adjoining hallway unless the lighting genuinely explains the difference.
However, applying identical editing settings to every image isn't the solution. A sunny bedroom and a kitchen with limited natural light may need different brightness and color adjustments to look accurate.
Once the photos are ready, arrange them in an order that helps buyers understand the property. After the cover image, consider showing the main living areas, kitchen, bedrooms, bathrooms, and outdoor spaces in a logical sequence. Remove nearly identical shots unless each reveals a useful detail or a different part of the room.
The goal is a consistent, easy-to-follow photo gallery that gives buyers a realistic understanding of the property.
Conclusion
Better listing photos begin with a usable original, not a heavy-handed edit. Focus on corrections that help buyers see the rooms, finishes, and layout as they really are.
Once your photos look consistent, choose a cover image that highlights the property's strongest feature, then check the uploaded versions for unexpected cropping or lost detail.
If a finished image is too small for your listing's display requirements, try Betatum AI Photo Upscaler to increase its dimensions while checking that important textures remain accurate.