
Create Clean Product Photos with AI Background Removal
By Maria · 2026-08-01
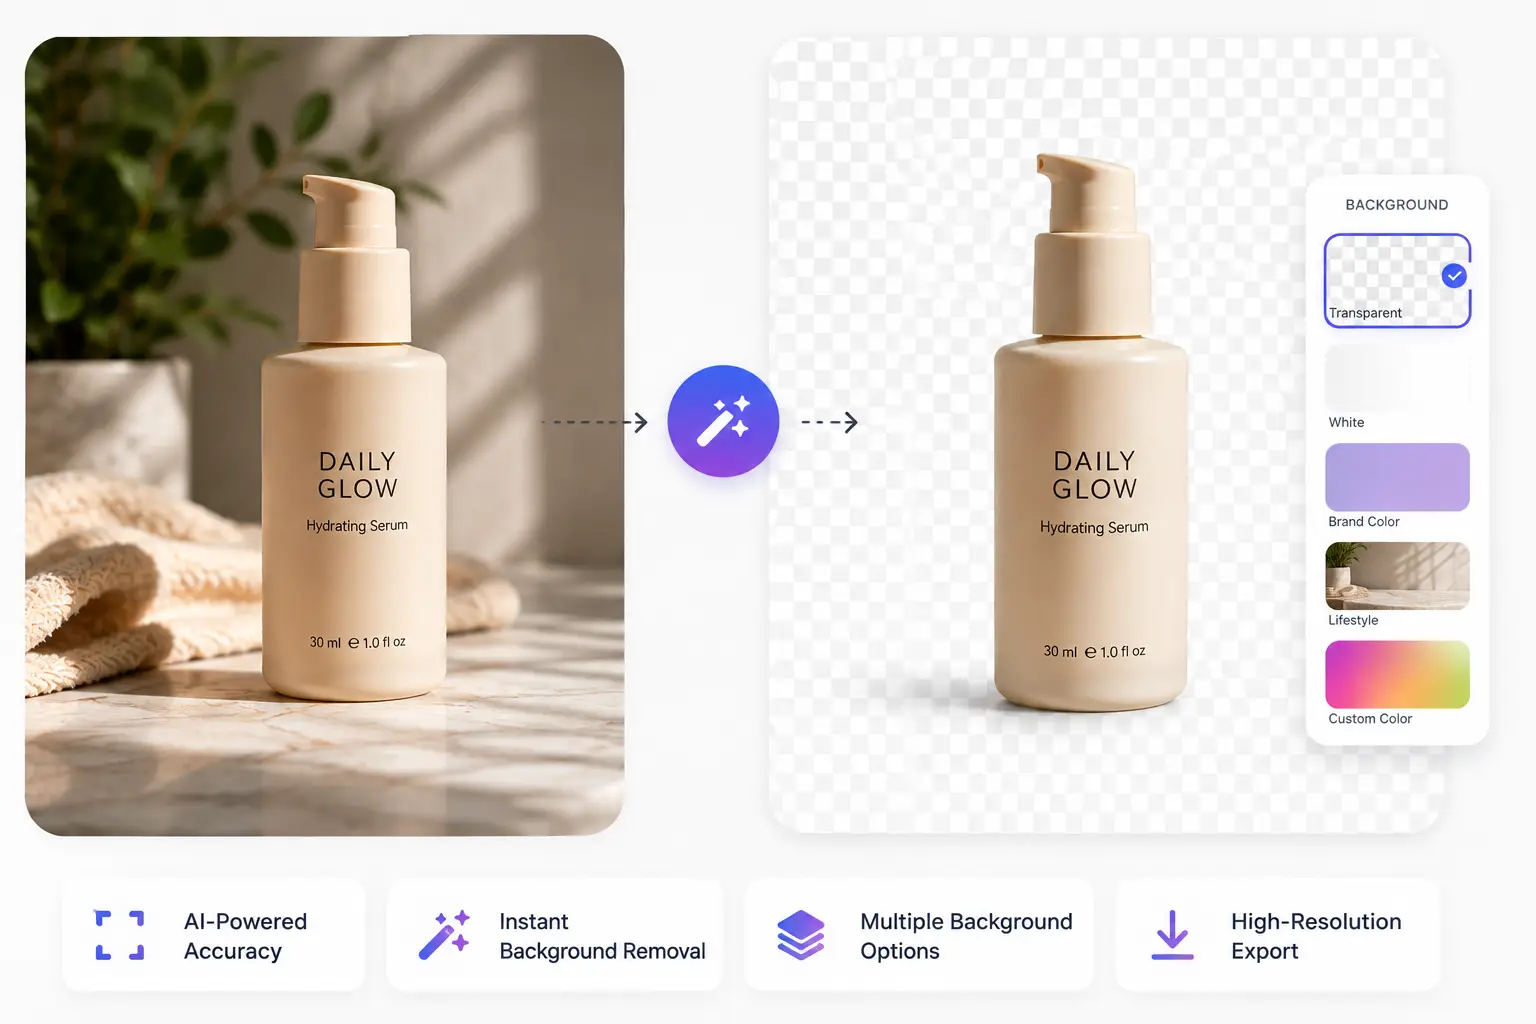
Messy backgrounds can make even a great product look less appealing. This guide shows you how to use AI background removal to create cleaner product photos, refine tricky edges and shadows, choose the right backdrop, and keep every image accurate, consistent, and ready for ecommerce.
A great product photo can directly influence whether a shopper keeps browsing or decides to buy. But distracting backgrounds, messy lighting, and inconsistent presentation can make even a good product look less trustworthy.
AI background removal helps clean up product images quickly, but a professional result depends on more than removing the background alone. In this guide, you'll learn how to prepare your photo, remove and replace backgrounds with AI, refine edges and shadows, choose the right background for each channel, and export cleaner ecommerce images without losing quality.
Summary
AI background removal helps turn ordinary product photos into cleaner, more reusable assets for ecommerce, ads, and social media. To get professional results, you still need a strong source image, clean edges, realistic shadows, consistent framing, and the right export format. This guide explains how to improve source photos, refine AI cutouts, choose between white, transparent, branded, and lifestyle backgrounds, and keep large product catalogs visually consistent.
What Does a Clean Product Photo Actually Look Like?
A clean product photo is not just a product placed on a white background. It is an image that keeps attention on the product, removes distractions, and shows the item exactly as it really is. Whether the background is white, transparent, a brand color, or a lifestyle setting, the product should stay as the clear focal point. A clean photo builds trust by improving presentation without changing the product itself.
A Clean Product Photo Should:
Keep the product as the main focus.
Show the real shape, color, material, and texture accurately.
Have clean, natural edges with no visible halos or rough cutouts.
Leave enough breathing room around the product instead of cropping too tightly.
Use a background that fits the sales channel, whether for marketplaces, ecommerce stores, ads, or social media.
Stay consistent with the rest of the product catalog in framing, scale, and style.
Avoid distracting props, stains, reflections, clutter, or unnecessary visual noise.
Keep a realistic contact shadow or surface connection when needed, so the product does not look like it is floating.
Clean Product Photo | Over-Edited Product Photo |
|---|---|
Accurate colors | Oversaturated or shifted colors |
Sharp, natural edges | Jagged, blurry, or overly soft edges |
Realistic contact shadow | No shadow or an artificial-looking shadow |
Product remains unchanged | Labels, shapes, textures, or details are altered |
Background supports the product | Background competes for attention |
Consistent crop, scale, and placement | Inconsistent sizing, cropping, or positioning |

Why Use AI Background Removal for Product Photos?
Removing a product from its background manually often means making precise selections, creating masks, and refining edges around details such as handles, cables, transparent materials, or curved surfaces. While professional editing software offers a high level of control, the process can be slow and repetitive, especially when working with large product catalogs.
AI background removal automates much of this work by detecting the product and separating it from its surroundings in seconds. Instead of starting every image from scratch, you can focus on reviewing the result, making small refinements where needed, and preparing the photo for its intended use.
Practical Benefits of AI Background Removal
AI background removal makes product photo editing faster, easier, and more consistent. It helps individuals and teams create cleaner visuals without needing advanced design or photo-editing skills.
Speeds up background cleanup for individual product photos
Makes editing more accessible for people without professional retouching experience
Exports transparent PNG files that can be reused across websites, marketplaces, ads, presentations, and other marketing materials
Helps maintain consistent backgrounds across an entire product catalog
Reduces the time needed to prepare images for ecommerce stores, social media, and campaigns
Makes it easier to create multiple versions of the same product photo for different channels
Supports batch workflows, allowing many product images to be processed more efficiently
Keep in mind that AI works best as a strong first pass. Before publishing, it is still worth checking the edges, shadows, colors, reflections, and overall realism to make sure the final image accurately represents the product.
Before You Remove the Background, Start With a Better Original Photo
AI background removal can improve a product photo, but it cannot fully fix a poor original image. If the source photo is blurry, overexposed, tightly cropped, or missing important details, the final cutout may still look unnatural or incomplete.
Before uploading your image, make sure the photo gives the AI a clear view of the product:
Clean the camera lens to prevent haze, smudges, or soft-looking details.
Use the highest image resolution available on your camera or smartphone.
Place the product against a plain, uncluttered background that contrasts with its color.
Use soft, even lighting to keep details visible without creating harsh shadows.
Avoid direct flash, which can cause glare, blown highlights, and strong shadows.
Leave enough empty space around every side of the product.
Keep the entire product visible, including handles, straps, corners, and packaging.
Avoid extreme camera angles that distort the product’s shape or hide important areas.
Use a tripod or stable surface when possible to reduce motion blur.
Check that labels, logos, textures, and other important details are sharply in focus.
Original Photo Problem | How It Affects Background Removal |
|---|---|
Product and background have similar colors | The AI may remove parts of the product or retain sections of the background. |
Strong, hard shadows | Shadows may be mistaken for part of the product or remain attached to the cutout. |
Blurry edges | The final cutout may appear soft, uneven, or difficult to refine. |
Product is partially hidden | The AI may omit missing areas or generate inaccurate details. |
Low resolution | Small labels, thin edges, and fine textures may disappear. |
Busy reflections | Reflected background objects may remain visible inside glossy or transparent surfaces. |
Overexposure | The edges of white or light-colored products may blend into the background and be lost. |
Cropped product | Missing sections cannot be restored accurately from background removal alone. |
The goal is not to create a studio-perfect photo before editing. It is simply to give the AI a clear, complete, and well-lit view of the real product.

Which Products Are Easy—or Difficult—for AI to Cut Out?
Not every product is equally easy for AI to separate from its background. Products with clear shapes, strong color contrast, and solid outer edges are usually easier to detect, while transparent, reflective, thin, or textured materials create more ambiguity.
Usually Easier | Usually More Difficult |
|---|---|
Boxes and rectangular packaging | Transparent bottles and glassware |
Shoes against a contrasting background | Reflective jewelry and polished metal |
Solid-colored bottles | White products on pale backgrounds |
Furniture with clear outer edges | Lace, mesh, and fringed fabric |
Electronics photographed from the front | Products with cables or thin straps |
Books and stationery | Fur, feathers, and fuzzy materials |
Products with limited reflections | Products with complex natural shadows |
Difficult products are not impossible to edit, but they require closer inspection around transparent areas, reflections, thin edges, soft textures, and natural shadows. A brief manual cleanup may also be needed before publishing.
How to Remove a Product Photo Background With AI
Removing a product photo background with AI only takes a few minutes. But if you want the final image to look clean and professional, it is worth spending a little extra time reviewing and refining the result.
1. Upload Your Product Photo
Start by uploading the highest-quality version of your product photo to Betatum AI Background Removal. Images with better lighting, sharper details, and clear product edges usually lead to more accurate results.
2. Let the AI Remove the Background
Once the image is uploaded, the AI automatically detects the product and removes the background. This gives you a quick first cutout that saves time, but it should still be checked before you export the final file.
3. Check the Product Edges Carefully
Zoom in and inspect the edges of the product, especially around areas that are usually harder to process, such as:
Handles
Thin cables or straps
Transparent materials
Curved edges
Fine fabric details, lace, or hair-like fibers
Look for rough cut lines, missing details, halos, or small background areas that were not fully removed.
4. Fix Small Errors Instead of Starting Over
If the AI removes a small part of the product or leaves behind bits of the original background, make small corrections only where needed. This is usually faster than repeating the entire process and helps preserve the parts that already look accurate.
5. Choose a Background That Fits the Use Case
After removing the original background, select a new one based on where the image will be used:
Transparent PNG for flexible reuse by designers or marketing teams
White background for ecommerce marketplaces and standard catalog listings
Neutral background for clean product pages and online stores
Brand-colored background for visual consistency across branded materials
Lifestyle background for ads or social media where the product needs a more realistic setting
The background should support the product, not pull attention away from it.
6. Adjust the Shadow and Placement
If the product looks like it is floating after the background is removed, add or keep a soft contact shadow to make it feel naturally placed. Also check the product’s position, scale, and alignment so it sits properly within the frame.
7. Crop, Resize, and Export the Final Image
Before exporting, make sure the image is cropped consistently with the rest of your product catalog and resized for the platform where it will appear.
Save a high-resolution master file first
Export PNG if transparency is needed
Export JPEG for solid-background images when smaller file sizes are preferred
Create separate versions for each platform instead of resizing the same exported file again and again
Finally, review the image one last time to confirm that the product’s colors, shape, labels, and proportions still match the real item.
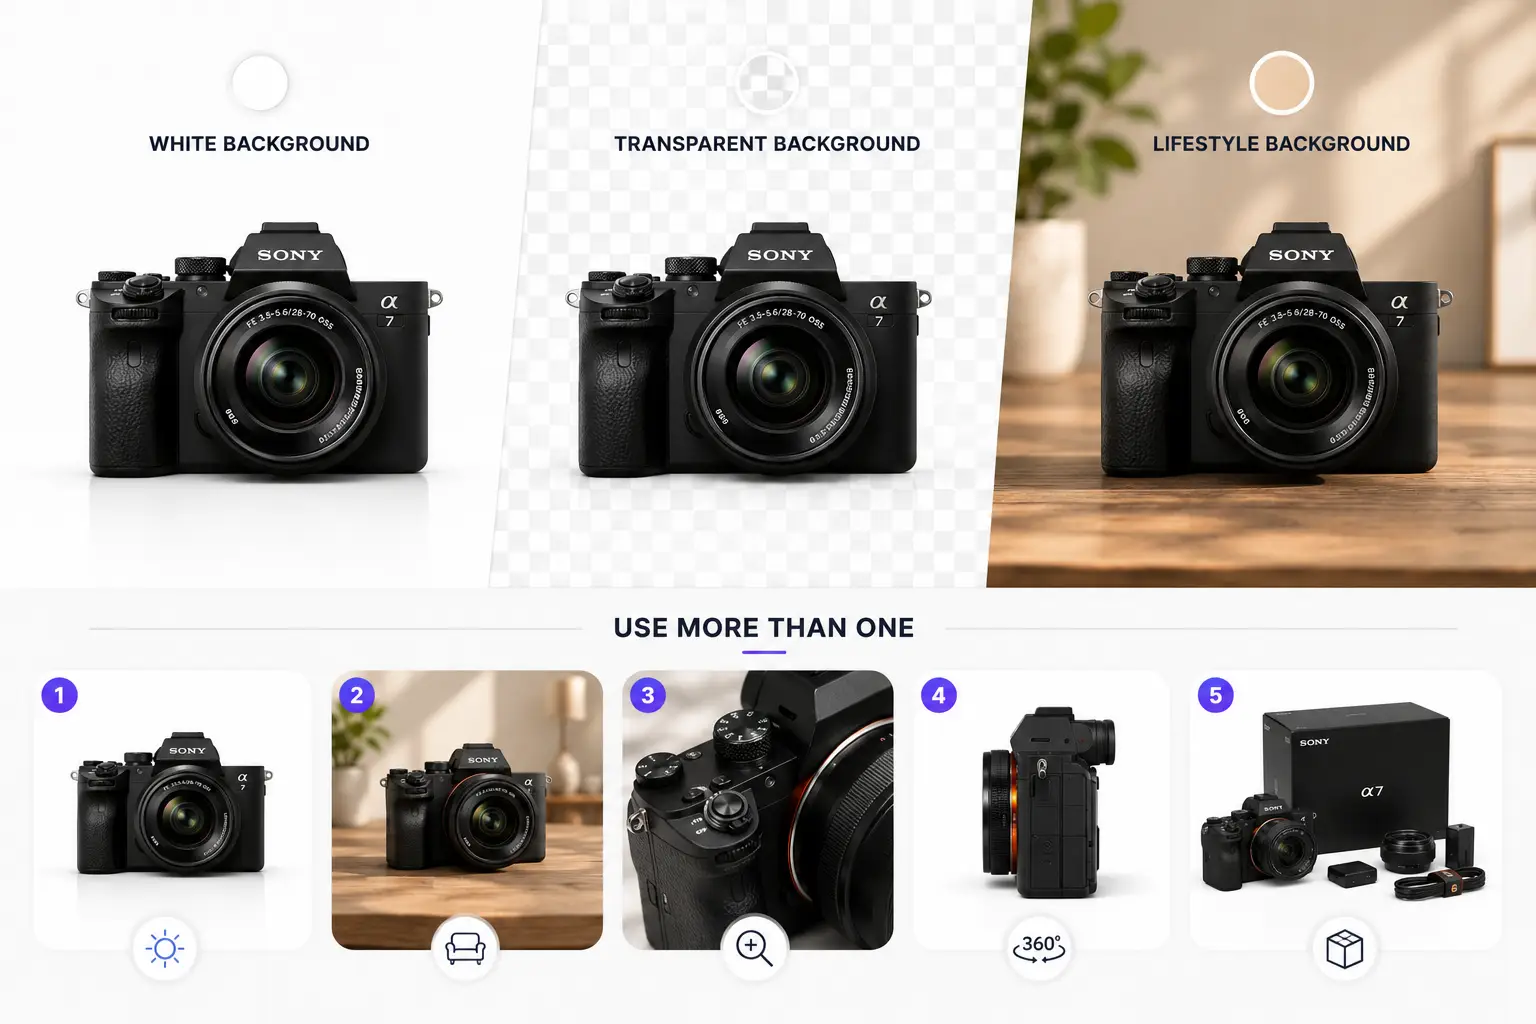
White, Transparent or Lifestyle—Which Background Should You Choose?
There is no single background that works best for every product photo. The right choice depends on where the image will appear and what shoppers need to understand at a glance.
A white background is usually the safest option for a main product image. As Shopify explains, it is the foundation of many ecommerce listings because it reduces distractions, improves consistency, and keeps attention on the product itself.
However, a white-background image should not be the only photo customers see. Contextual images help shoppers understand scale, use case, and how the product looks in a real environment. Baymard’s research also shows that many users rely on product photos to estimate size, which means a cutout alone is often not enough.
Can You Use More Than One Background?
Yes — and in many cases, you should. The most effective product galleries usually combine more than one image style so customers get both clarity and context.
A strong ecommerce gallery often follows this structure:
Image 1: White background hero image
Image 2: Lifestyle photo
Image 3: Close-up detail shot
Image 4: Multiple product angles
Image 5: Packaging or included accessories
This is a common approach among successful online stores because it helps customers evaluate the product from different perspectives without overwhelming the main listing image.
How to Make a Cutout Product Look Naturally Placed
A successful background removal shouldn't draw attention to itself. If customers immediately notice rough edges, unrealistic shadows, or a product that appears to float, the edit becomes obvious. These final refinements help the cutout blend naturally into its new background while keeping the product true to life.
Clean Up Bright or Dark Halos Around the Edges
Halos are one of the most common signs of an artificial cutout. They appear when small traces of the original background remain around the product outline, creating a light or dark border that becomes noticeable on a different background.
To spot and fix halos:
View the product against both light and dark temporary backgrounds.
Refine only the affected areas instead of re-editing the entire cutout.
Avoid excessive feathering, which can make edges look blurry.
Zoom in and inspect curved corners, transparent sections, handles, and small openings where halos are easiest to miss.
Keep a Realistic Contact Shadow
A realistic shadow helps the product feel connected to its surface instead of floating unnaturally. Not every shadow serves the same purpose:
Shadow Type | Purpose |
|---|---|
Contact shadow | A small, soft shadow directly beneath the product where it touches the surface. |
Cast shadow | The larger shadow created by a light source shining across the scene. |
Reflection | A mirrored appearance on glossy or reflective surfaces rather than a true shadow. |
If the original shadow is removed, adding a subtle contact shadow is often enough to make the product feel naturally grounded without making the edit obvious.
Match the Product Lighting to the New Background
Even a perfectly cut-out product can look fake if its lighting doesn't match the new scene. A brightly lit product placed on a dark background—or the opposite—often looks pasted into the image.
Before exporting, compare the product and background for:
Light direction
Color temperature
Shadow direction
Overall brightness
Contrast
The closer these elements match, the more believable the final composition will appear.
Keep Scale and Perspective Believable
A product should look as though it naturally belongs in its new environment. If it's too large, too small, or photographed from a different angle than the background, the result can feel unrealistic.
Check that:
The product size matches nearby objects or the available space.
The camera height is consistent with the background scene.
The surface angle and perspective align naturally.
The product is positioned with enough surrounding space instead of appearing squeezed into the frame.
Remove Color Spill From the Original Background
Strongly colored backgrounds can leave a subtle tint around the edges of light-colored, transparent, or reflective products. Green, blue, or warm-colored backdrops are especially likely to create unwanted color spill after the background is removed.
Inspect the product outline carefully and remove any remaining color fringing before exporting. Neutral, clean edges help the product blend naturally into its new background without revealing traces of the original scene.
10 Background Removal Mistakes That Make Product Photos Look Cheap
Even a good AI cutout can look unprofessional when the source image, edges, shadows, or export settings are handled poorly. Watch out for these common mistakes:
Starting with a blurry or compressed image
Fine labels, textures, and thin edges cannot be recovered reliably. Use the highest-quality original available.
Photographing the product against a similar-colored background
AI may confuse the product with its surroundings and remove parts of the item. Choose a background with clear contrast.
Deleting every visible shadow
Without a contact shadow, the product may appear to float. Preserve or recreate a subtle shadow where the product meets the surface.
Ignoring bright or dark edge halos
Leftover traces of the original background make the cutout obvious on a new backdrop. Check the image against both light and dark backgrounds.
Using an overly soft edge
Excessive feathering makes the product look blurry and reduces definition. Refine only the problem areas.
Accepting the first result without zooming in
Small missing sections, leftover pixels, or damaged details can go unnoticed. Inspect handles, corners, labels, straps, and transparent areas closely.
Replacing the background with an unrelated scene
Mismatched lighting, perspective, scale, or camera height makes the product look pasted into the image. Choose a scene that matches the original photo.
Changing the real product color during editing
Heavy filters or color adjustments can misrepresent what customers will receive. Keep the product’s actual color, finish, and materials accurate.
Using inconsistent crops across the catalog
Random sizing and placement make product grids look disorganized. Apply the same canvas ratio, margins, scale, and alignment.
Exporting every image in the same format
Transparent assets, website images, marketplace listings, and print files have different needs. Use PNG for transparency, JPEG for solid-background photos, and WebP where efficient web delivery is required.
How to Keep Hundreds of Product Photos Consistent
Editing a single product photo is relatively straightforward. Keeping hundreds of product images visually consistent is a different challenge. Without clear standards, small differences in backgrounds, cropping, shadows, or product placement can make an ecommerce catalog look inconsistent and less professional. A simple style guide helps every image follow the same visual rules, whether it's edited today or months from now.
Create a Simple Product Image Style Guide
Define these standards before editing large numbers of images:
Element | Standard to Define |
|---|---|
Background | White, neutral, or an approved brand color |
Canvas ratio | For example, square (1:1) or portrait (4:5) |
Product placement | Consistent horizontal and vertical alignment |
Product scale | Similar percentage of the canvas occupied by the product |
Empty space | Consistent margins around all sides of the product |
Shadow | Consistent softness, direction, and intensity |
Camera angle | Consistent within each product category |
File format | PNG, JPEG, or WebP based on the final use |
Resolution | Defined master resolution and delivery sizes |
File naming | Product name, SKU, and view angle (for example, running-shoe-12345-front.png) |
Best Practices for Large Product Catalogs
Managing image edits for hundreds of items requires a balance of speed, quality, and visual consistency. Setting up a standardized workflow ensures your entire store looks professional while saving hours of manual editing.
Use batch background removal for products photographed under similar conditions.
Apply the same canvas size, crop, and alignment across the entire catalog.
Review a small sample before processing hundreds of images to confirm the settings produce consistent results.
Spot-check more challenging products—such as transparent, reflective, or textured items even after batch processing.
Keep the original, unedited photos so you can return to the source if editing standards change.
Save a high-quality editable master before exporting versions for websites, marketplaces, social media, or print.
Avoid repeatedly saving the same image as JPEG, since each export can introduce additional compression and gradually reduce image quality.
Consistency isn't about making every product look identical. It's about ensuring every image follows the same visual standards, so customers focus on the products rather than noticing differences in editing style.
Tip: If multiple people edit product photos, document these standards and use the same export settings, naming convention, and review checklist. A shared workflow is one of the easiest ways to keep a growing product catalog visually consistent over time.

How to Export Product Photos Without Losing Quality
A carefully edited product photo can still lose sharpness, color accuracy, or transparency during export. The best file format depends on where the image will be used, so it is worth choosing the right export type instead of using one version everywhere.
Use PNG When You Need Transparency
PNG is the best choice when you need a product cutout with a transparent background. It preserves clean edges and works well for website layouts, advertisements, presentations, and branded design assets.
That said, PNG files are often larger than JPEG or WebP, so they are not always the most efficient option for every use case. It is usually best to keep the transparent PNG as your master asset and create optimized versions for specific channels.
Use JPEG for Solid-Background Marketplace Photos
JPEG is usually the right choice for product images placed on white, neutral, or other solid backgrounds. It produces smaller file sizes than PNG and is widely supported by ecommerce platforms and marketplaces.
Export at a high-quality setting, and avoid repeatedly opening and resaving the same JPEG. Because JPEG uses lossy compression, each new export can gradually reduce detail, soften edges, and affect labels or fine textures.
Consider WebP for Website Performance
WebP can reduce file size while maintaining strong visual quality, which makes it useful for ecommerce websites where page speed matters. It supports both solid and transparent backgrounds, depending on the export settings.
Even so, WebP should usually be treated as a delivery format rather than your only saved version. Keep the highest-quality master file so you can create new sizes or formats later without starting from a compressed image.
Keep Product Colors Consistent
Export settings should never change how the product looks in real life. Before publishing, make sure to:
Use the sRGB color space for websites, marketplaces, and social media.
Compare the exported image with the original product photo.
Check that whites, skin tones, packaging, materials, and brand colors still look accurate.
Avoid filters or heavy color adjustments that make the product appear more saturated, warmer, cooler, or brighter than it really is.
Color consistency is especially important when customers are choosing between shades, finishes, or product variations.
Create Separate Master and Delivery Files
Do not keep resizing and overwriting one file. Save a high-quality master version first, then create separate exports for each channel.
File Version | Recommended Use |
|---|---|
Master file | Highest-quality edited version, saved in an editable or lossless format |
Website version | Optimized dimensions and file size for faster loading |
Marketplace version | Resized and exported according to platform requirements |
Social media version | Cropped to the correct aspect ratio and size for each platform |
Print version | Higher-resolution file prepared for the intended print size |
Use clear file names so every version is easy to identify, such as product-sku-master.png, product-sku-web.webp, or product-sku-instagram-4x5.jpg. This keeps your original quality safe while making each exported image suitable for its final destination.
AI Background Removal vs. Manual Editing
AI background removal is best for speed, routine images, and large catalogs, while manual editing provides greater control over transparent materials, reflections, and complex edges.
Factor | AI Background Removal | Manual Background Removal |
|---|---|---|
Speed | Fast for most standard product images | Slower because each image is edited individually |
Ease of use | Beginner-friendly and accessible with little editing experience | Requires photo-editing skills and familiarity with masking tools |
Simple products | Usually delivers accurate results | Highly accurate with full control |
Transparent products | May need extra correction | Better control over glass, liquids, and transparent materials |
Thin or complex edges | Can miss fine details such as cables, lace, or fur | Allows more precise refinement of difficult edges |
Large catalogs | Well suited for batch processing and consistent workflows | Time-consuming when many images need individual editing |
Creative control | Moderate | High |
Best use | First-pass cleanup and everyday product images | Complex products, difficult materials, and final precision work |
For most ecommerce workflows, the best approach is hybrid: use AI for the first pass, then reserve manual refinement for difficult products and high-value hero images.
Clean Editing Should Never Change the Product Customers Receive
The purpose of AI editing is to improve presentation, not to change the product itself. Removing a distracting background, cleaning up the edges, or fixing the shadow can make a product photo clearer and more professional, but the item should still look exactly as it does in real life.
When editing product photos, never alter the product’s core details, including:
Product color
Package size
Materials
Label text
Included accessories
Surface finish
Shape
Quantity
Product condition
Accuracy matters because product images play a direct role in buying decisions. According to Salsify’s 2025 Consumer Research, 71% of surveyed shoppers said they had returned a product because of incorrect product content, including cases where the images did not match the item received. A polished image should remove distractions, not create false expectations.
A cleaner product photo is only valuable when it remains honest. The best product images help customers understand exactly what they are buying, building trust through clarity, consistency, and accuracy rather than visual exaggeration.
The 30-Second Quality Check Before Publishing
Before uploading the image to your store, marketplace, or campaign, take 30 seconds to review it at full size. A quick final check can reveal small editing problems that are easy to miss when working quickly.
Are all product edges complete and naturally defined?
Is the product’s real color accurately preserved?
Are labels, logos, and important details readable?
Does the product have a natural contact shadow when needed?
Is the crop, scale, and placement consistent with the rest of the catalog?
Does the background suit the intended sales channel?
Are there any bright halos, dark outlines, or leftover background pixels?
Do the lighting, perspective, and shadow direction match the new background?
Has the product remained unchanged during editing?
Is the image exported in the correct size and file format?
If any answer is no, correct the issue before publishing rather than relying on customers not to notice it.
Conclusion
Creating clean product photos with AI involves more than simply removing the original background. The best results start with a clear, well-lit source image, followed by careful edge refinement, realistic shadows, consistent framing, and a background that suits the intended sales channel.
Before publishing, review the final image at full size to make sure the product still looks natural, accurate, and consistent with the rest of your catalog. AI can speed up the editing process, but a final quality check is what turns a quick cutout into a professional ecommerce image.
Have a product photo with a distracting background? Try Betatum AI Background Removal to create a cleaner cutout, then use the steps in this guide to refine and prepare it for your store, marketplace, or marketing content.